About this Guide and SoftEther
This guide helps you install and operate SoftEther.
SoftEther is an extremely versatile but still very user friendly VPN system.
It supports it's own SoftEther protocol as well as these common protocols:
L2TP, SSTP, IPsec, OpenVPN.
PPTP is not supported as it's no longer considered to be secure.
Note: This guide makes a few assumptions:
- You understand the basics of how networks interact using routers
- You know the network internals of your operating system of choice (for example how to assign a static IP)
- You know how to make TCP and UDP ports accessible to the internet
Installation and configuration will take approximately 15-30 minutes.
VPN Server Installation
This chapter explains the basic server installation.
Requirements
Requirements for the VPN server
Minimum
- Machine running Windows, Linux or Mac OS
- Internet access
This guide will use Windows as the system of choice
Recommended/Optional
In addition to the minimum requirements- Static public IP address
- Port forwarding support (or other means to make the VPN server reachable)
- Certificate authority (needed for CA certificate based user login only)
- RADIUS server (needed for RADIUS based user login only)
- Windows domain (needed for NT domain based user login only)
Download
For Windows only:
You can download the binaries using
Gitload.
The download speed is usually much faster this way.
The server installer is the blue button that starts with softether_open-vpnserver.
In case the authors ever stop publishing binaries on GitHub, use the instructions below.
For any supported OS:
Download the installer from
softether-download.com.
The component you need is the "Softether VPN Server".
Select the appropriate operating system and processor architecture.
After all selections are made, download the file on top of the list.
Server Installation
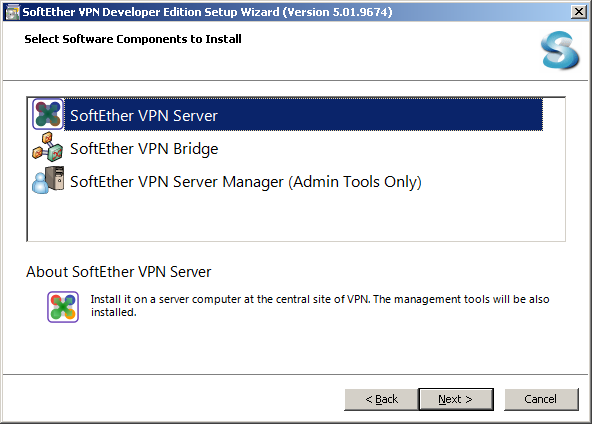
Run the installer on your server. When asked, select "SoftEther VPN Server". You can optionally install the "Admin tools only" selection on any machine you want to manage this server from later. The VPN server itself already contains the admin tools.
Accept the license agreement in the next step. Then continue with the installer. Leave all settings on their default values.
Initial Server Configuration
Note: Everything you configure in this chapter can be changed later. None of the settings are final. You can also at any time reset your server so feel free to experiment later on.
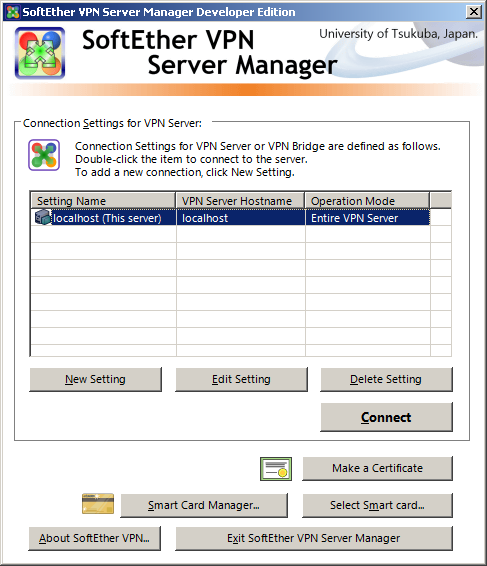
The server configuration is automatically started after the installer completes. You can also find it in the start menu. By default, the local machine will already be in the list of VPN servers.
Click "Connect" to connect to the local server. The first time you connect you will be prompted to enter a server password. Please enter a secure password (preferrably generated by a password manager). Anyone on the internet can try to break this password once you make the VPN server accessible.
A randomly generated password is shown below.
							JavaScript is turned off.
							Open a text editor and place your cat on the keyboard
							as an alternative random number generator.
VPN Type
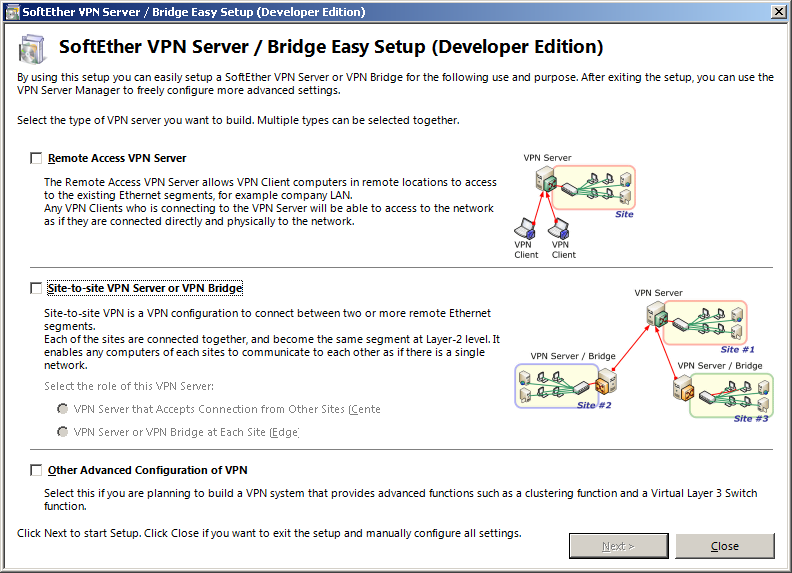
The first time you connect you will see an "Easy Setup" dialog. Check the "Remote Access VPN Server" option and click "Next". You will be asked to confirm your selection. After confirmation, you can name your hub. By default, the name is "VPN" but you can change it as you like. In most cases you want to leave it on its default value.
Dynamic DNS
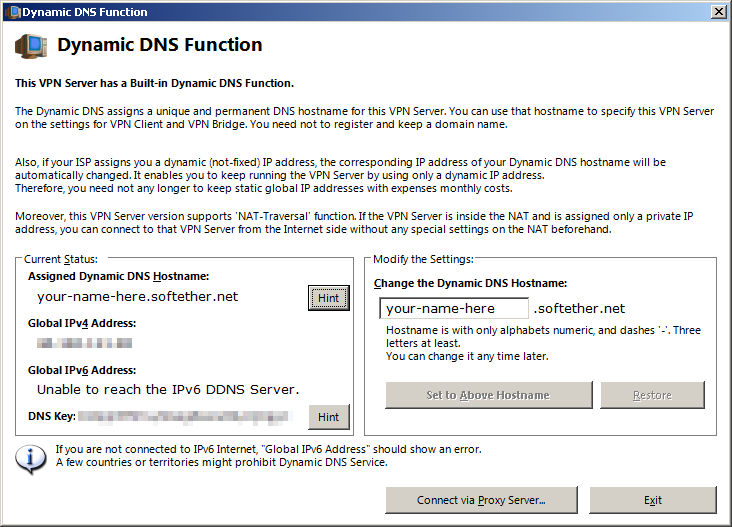
Next you will be asked about a dynamic DNS name.
If you have a fixed IP address you can ignore this page and just click "Exit".
Otherwise, chose a name you like before exiting.
This feature can be completely disabled at a later point if you don't want it enabled.
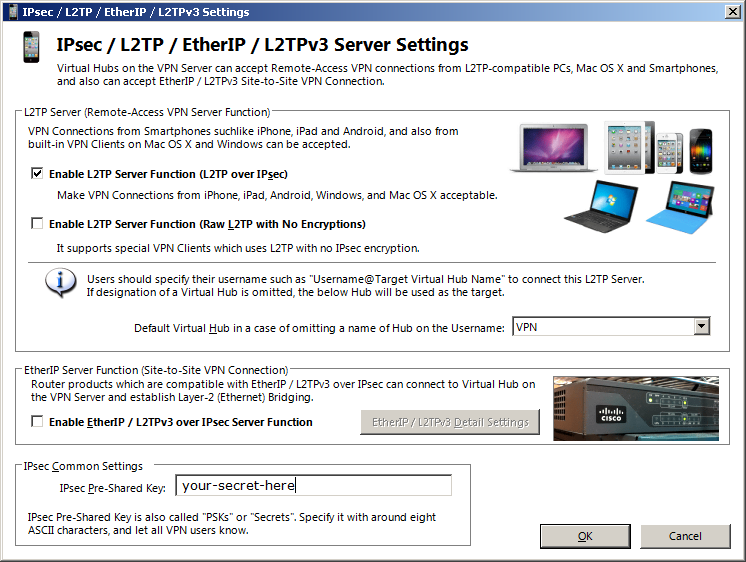
L2TP and IPSec
Next you will be asked about L2TP.
L2TP is a VPN protocol that is supported by most operating systems.
This means that if you enable it,
you won't need to install a VPN program on your clients.
If you want to connect using L2TP you can check the first box "Enable L2TP Server Function (L2TP over IPsec)".
Enter a shared secret in the "IPsec Pre-Shared Key" box at the bottom.
Later on, that key has to be entered on all devices that connect via L2TP VPN.
This means if you change this later, all devices will lose connectivity.
Enter something that can also be typed on a phone keyboard and is limited to ASCII.
ASCII means this:
- Lowercase:
a-z - Uppercase:
A-Z - Digits:
0-9 - Symbols:
!"#$%&'()*+,-./:;<=>?@[\]^_`{|}~
A randomly generated pre-shared key is shown below.
							JavaScript is turned off.
							Open a text editor and place your cat on the keyboard
							as an alternative random number generator.
When you're done, click "OK". If your chosen shared secret is 10 or more characters, you will get a warning that long secrets make problems with some versions of Android. Read the message carefully, and decide for yourself whether to keep or change the key. I never had problems with Android, in fact Google recommends 32 character secrets for their own cloud services.
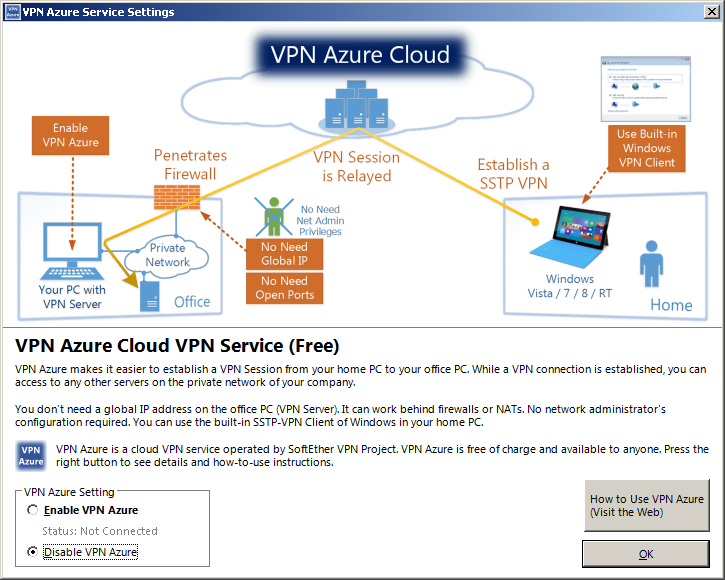
VPN Azure
The next screen is for VPN Azure Services. In most cases, you can disable them in the lower left corner of the window. VPN Azure Services allow you to run your VPN server in an environment that doesn't normally allows you to operate a VPN server. This can be your company network as well as your home network if you can't configure the router your provider forces you to use.
VPN Azure will add some delay to your VPN connections. If you're unsure whether or not you can run a VPN server in your network, try to run it without APN Azure first.
Note: VPN Azure will only work with the MS-SSTP VPN protocol.
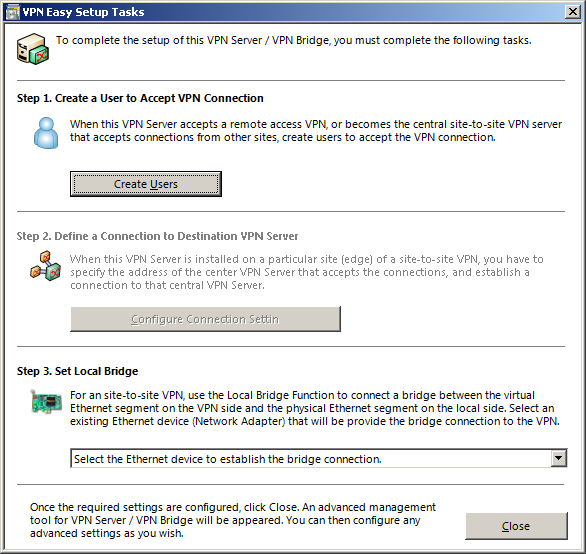
Final Steps
This is the last screen of the initial configuration. You can perform a few final configurations here. Creation of users is explained in a later chapter. Do not bridge the VPN adapter yet (Step 3). Depending on the type of VPN access you want to grant, you might not want to bridge the adapter. See the chapters below for when to bridge adapters and when not to.
Configuration
This chapter explains how to configure your VPN server. It explains configuration for the most common VPN access types and all user authentication types.
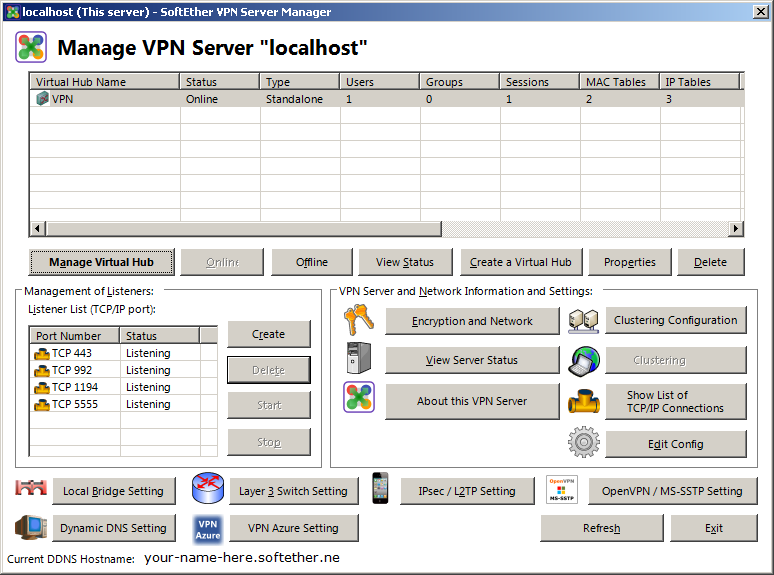
Configuration Overview
After you've completed the initial configuration during the installation process, this will be the window that is shown whenever you connect to the server. The main configuration window appears crowded at a first glance. The window is however divided into three sections.
The top section is where you configure most of the VPN settings. This includes users, access restrictions, and routing configuration.
The middle section is for the general server configuration. Here you'll make changes that will have an effect on the entire server. The only function you need in most cases is the "Encryption and Network" button. You can use this to change your password or install a server certificate.
The bottom section of the dialog is to bring up various configuration windows. Most of those were already shown to you during the initial configuration steps.
Network Configuration
At this point you want to give your VPN server a static IP address if you did not already do this. If you don't do that, you risk your server becoming unreachable in case your local DHCP server assigns it a new IP. As an alternative, you can check your DHCP configuration. Some DHCP servers allow you to make reservations. You can use that to have it always assign the same IP to your VPN server.
You also want to open at least one (but preferrably all) TCP ports shown in the main window in your firewall and forward them on your router if they need forwarding. If you want to accept OpenVPN connections, forward at least one UDP port also. You can configure OpenVPN UDP ports with the "OpenVPN" button in the bottom right corner.
You normally don't want to change the ports, but the configuration window allows you to add and remove ports as you want. By default, SoftEther listens on 443, 992, 1194 and 5555. Port 443 is the one that SoftEther VPN clients will default to. If you remove that port, your users have to select another port number. SoftEther makes no distinction between VPN types. All TCP ports accept all VPN types. However, most L2TP and SSTP implementations don't allow users to set the ports. Depending on the protocols you enabled, you have to forward additional ports that are not explicitly listed in the management window.
- L2TP: TCP(1701), UDP(500), UDP(4500)
- MS-SSTP: TCP(443)
SSTP is enabled by default. You can disable it on the bottom right in the main window.
UDP Hole Punching
This VPN server supports NAT traversal via UDP hole punching.
This means that it will try to abuse how UDP works to forward ports
if you don't do this yourself.
Whether NAT traversal is in effect or not,
can be seen by connecting to the server from a VPN client.
If NAT traversal is in effect and was used to make the connection,
a message will be displayed on the client.
To disable this feature,
change bool DisableNatTraversal false to
bool DisableNatTraversal true
in the ServerConfiguration section of the configuration file.
How to edit the file is shown in the next chapter.
Disabling dynamic DNS
If you want to disable the integrated dynamic DNS client, you can do so by editing the configuration.
Note: Disabling dynamic DNS also disables VPN Azure support.
- Click "Edit Config" in the main window, then click "Save to File"
- Open the file in a text editor and find the
DDnsClientsection -
Edit the configuration by changing the line
bool Disabled falsetobool Disabled true - Click "Import File and Apply" to load the changed file
- Exit and restart the server manager
- You will find the button "Dynamic DNS" grayed out
Note: you cannot edit the file directory in the "Edit Config File" window itself, however, you can edit the real config file in the installation directory if you shut down the VPN server service before editing.
VPN Access Type
There are three possible types of access you can configure. This is access to the LAN, access to the Internet, and access to both. You can at any time switch from one type to another by reverting the changes made to get one type and then applying the changes needed to get another type.
Access to Internet and LAN
This type is useful if you're setting up this VPN in a company and want all traffic
to flow through your company network.
This is recommended if you hand out company laptops and mobile phones to users.
There are two ways to grant access to the LAN and the internet at the same time.
The simple configuration will be explained first.
Simple Configuration
Use this type if you want the simplest configuration and maximum compatibility
with devices in your LAN.
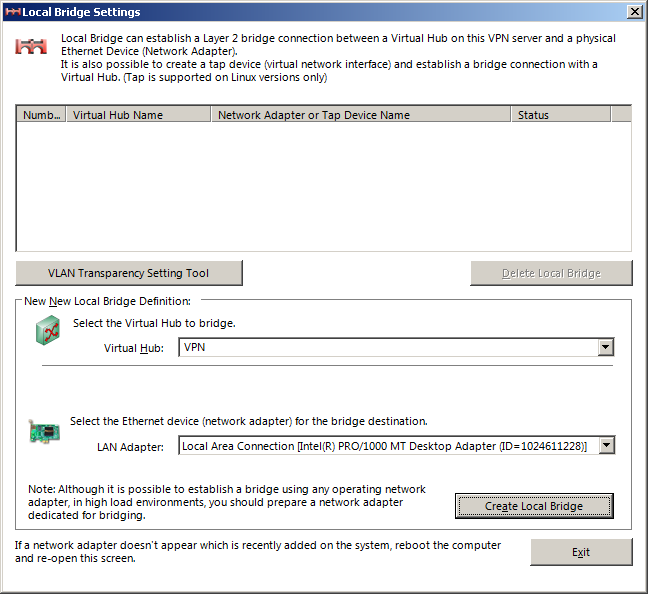
This is the simplest type to configure but also the least flexible.
In the main window, open the "Local Bridge Setting".
Select your hub from the drop down
and select the network adapter to bridge this hub to.
If you can chose from multiple adapters,
pick the one that is connected to your LAN.
Click on "Create Local Bridge" and then exit the dialog.
Your VPN is now configured. Authenticated users will appear as if their device was connected to the LAN. When they connect, they will get an IP address assigned by your local DHCP server. Nobody will know that these people are from another network. They can access all LAN resources and the internet as if they were locally connected.
SecureNAT Configuration
Using SecureNAT places the VPN users into their own subnet. To do so, simply enable SecureNAT in the hub properties (see below on how to reach this). Do not change any of the values unless they conflict with an existing network. Note that because your users appear on another network, things like broadcasts over the LAN will not propagate between VPN and LAN.
Access to LAN Only
Use this type if you're setting up this VPN server in a data center, or when you set it up at a slow home connection with a small bandwidth.
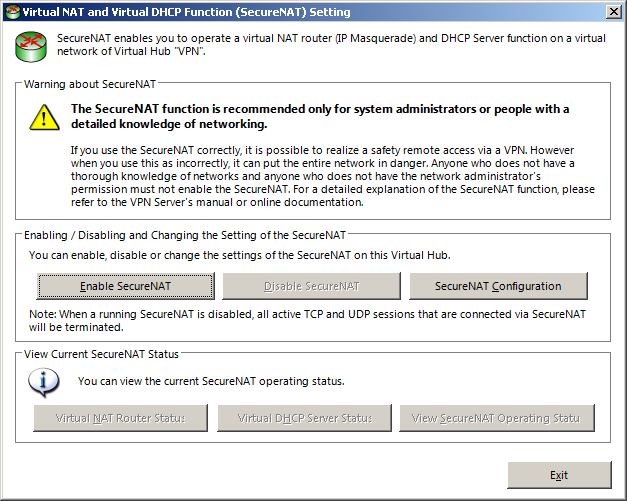
This type of VPN will allow users to connect to your LAN, but if they try to access anything outside of it (for example a public website), their computer will use their normal internet connection for this. This reduces the bandwidth requirement and you're not held accountable if users visit illicit websites.
In the main Window, double click your hub or select it and click "Manage Virtual Hub". The window that pops up will be explained further down in more detail, for now, click on the large "Virtual NAT and Virtual DHCP Server (SecureNAT)" button.
Click "Enable SecureNAT" and confirm the alert with OK.
Click on "SecureNAT Configuration"
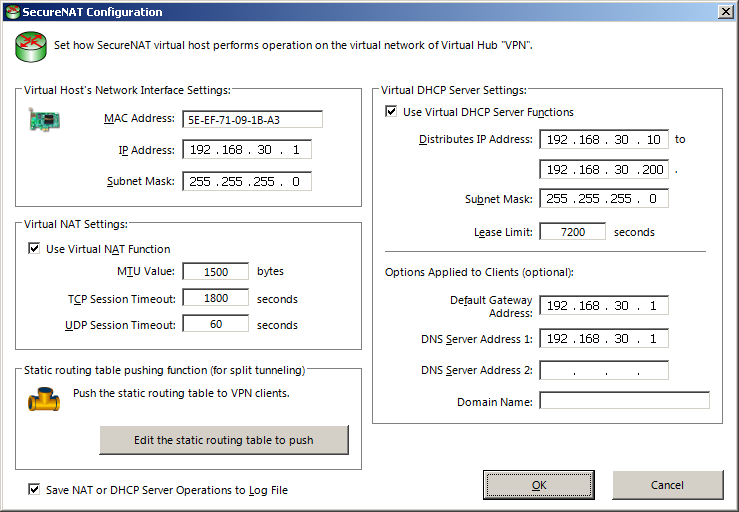
In this window you can change the network configuration for the virtual network. You normally don't need to touch the basic settings, but you can change the IP address ranges of the DHCP server and the IP address and netmask of the virtual network adapter if they conflict with another network.
In the lower right portion, clear the field of the "Default Gateway Address" so it's empty. Clearing the "DNS Server Address" fields is optional.
When you're done, click on the "Edit the static routing table to push" button.
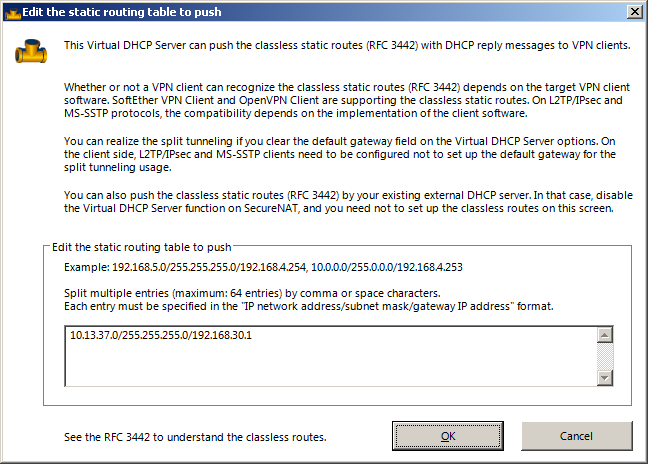
In this window you configure access to your LAN network.
For this you need to know the network address of the LAN as well as the subnet mask.
You enter the configuration in the format network/subnet/router
as seen in the screenshot.
The router IP is the "IP Address" field in the top left of the previous dialog.
If you did not change the default, it's likely 192.168.30.1
Once you are done, you can exit with "OK" button twice to get back to the hub settings, and exit from there using the "Exit" button.
Access to Internet Only
Use this type if you're setting up this VPN server to bypass restrictive firewalls, for example at a public Wifi network. It also helps to keep traffic away from spying eyes to some degree. See the traffic security warning further down to get to know what this means.
This type of VPN will make a device route all traffic through the VPN, but will not grant access to any devices in the network this VPN server is.
To configure this type of VPN, enable SecureNAT as instructed in the previous chapter. DO NOT delete the default gateway address, and DO NOT add entries to the static routing table. Keep it empty.
Click "OK" to accept the settings and "OK" again to go back to te hub window
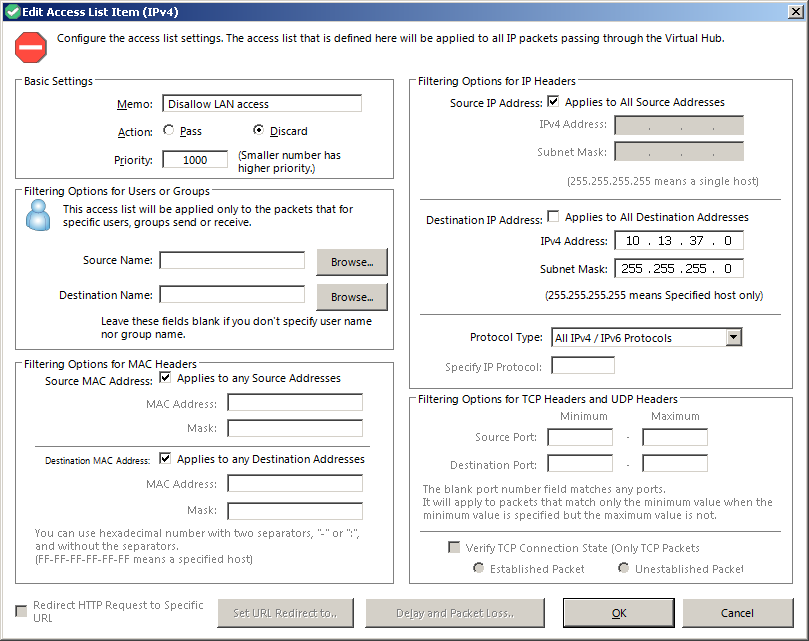
Back in the hub window, click on "Manage Access Lists" in the top left section. Click "New (IPv4)" and add a rule to discard traffic to the LAN. Set the name to anything you like, set the type to "Discard", then fill in your LAN network and subnet address on the right side of the Window. Fill it into the destination section only, then click "OK".
Repeat this step again but this time, fill the addresses into the Source fields only.
If your LAN has IPv6 set up, create two rules for the IPv6 ranges too.
After you're done, click "Save", then exit the hub manager
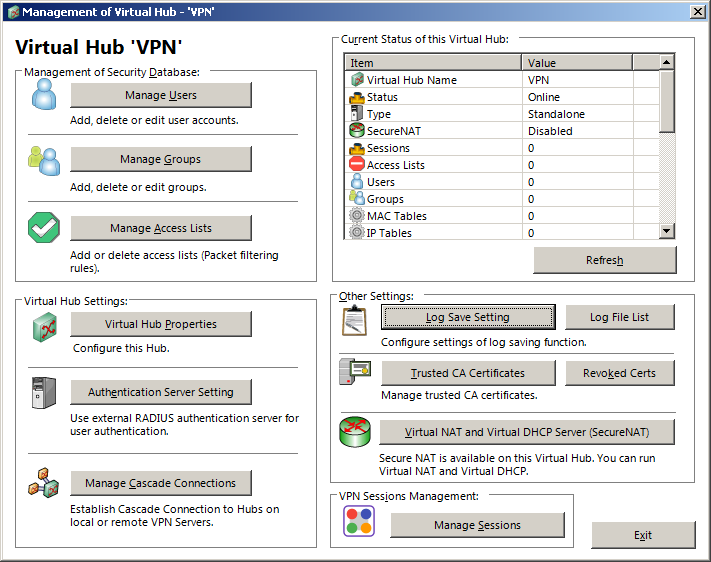
Managing Users and Groups
Users and groups are managed through the hubs. Each hub has its individual user and group settings. Double click on the hub you want to manage in the main window to bring up the hub window.
Groups
Groups are optional and can be used to apply security policies to users more easily. A user can be in at most one group. To add a group, click on "Manage Groups", then "New". The security policy will be explained in a later step.
Users
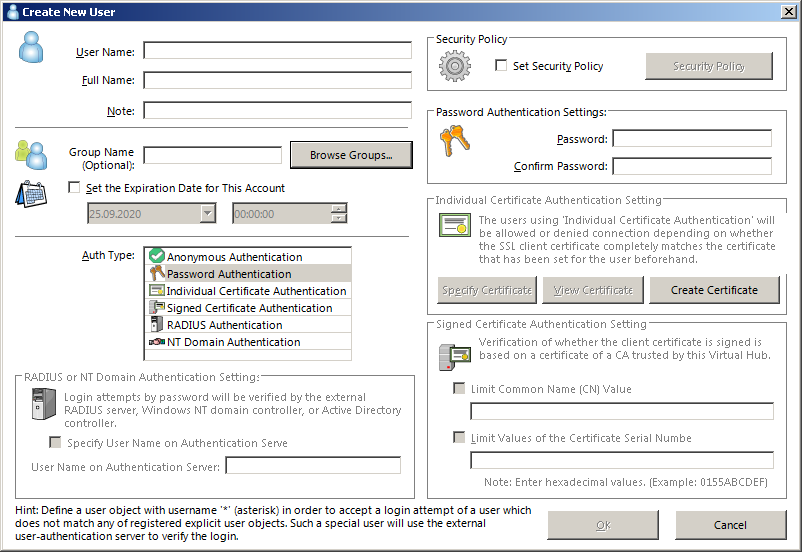
Create a new user by clicking on "Manage Users", then "New" in the hub manager.
The minimum you want to do is setting a user name, selecting "Password Authentication" from the authentication type, then define a password and click "OK". Authentication types are explained further below.
This window allows for a few additional configurations, such as the security policy (this is identical to the policies in groups) and an automatic expiration of accounts.
Special User
You can use * as a user name.
This user is then used for all logins that don't match any other defined name.
This special user can only use RADIUS or NT domain authentication.
Selecting other authentication types will leave the "OK" button disabled.
If you create this user, you can manage users on your RADIUS or Active Directory server and don't need to fiddle with any more users on this VPN server.
User Authentication Types
This chapter explains the user authentication types available on the VPN server. Each user account can have exactly one authentication type. You cannot create duplicate user names to bypass the single auth restriction. If you want to allow a user to log in via different means, you need to create multiple users with different names.
Anonymous Authentication
This type requires no form of authentication at all. Merely knowing the user name will grant access to the VPN. There is almost no practical reason to use this type. There's only two scenarios where you want to use this type. One is that you run a VPNGate server (but then this is usually done for you), the other scenario is that you can otherwise secure the connection, for example by only permitting a certain IP address to connect.
Password Authentication
This is the most common form of authentication. Simply specify the password on the right side of the user window and you're done.
Note: This VPN implementation allows users to change their password. To do so, they have to open the properties of the VPN connection in their client, then click on "Change Password". If you don't want to allow this, you can disable password changes. There's a "Deny Changing Password" policy in the security policy settings.
Individual Certificate Authentication
This authentication type uses a certificate instead of a password. You can specify the certificate on the right side of the user management window. The client also offers you to generate a certificate. Certificate authentication is generally more secure than password authentication, but it's also more difficult to configure, especially on mobile platforms.
Note: The server does not needs the private key of the certificate. After you install the certificate on a user machine, you want to either delete the private key from the server, or store it in a secure location.
If you decide to use certificates, use the "Signed Certificate Authentication" method instead. It allows for a more fine grained control, and if you run an Active Directory, you can set up tools and scripts to automatically push certificates to the clients that are allowed to use the VPN.
Signed Certificate Authentication
This method is almost identical to the other certificate authentication, but instead of manually configuring a certificate for each user, you can make the server accept trusted certificates automatically.
This setting allows you to apply limits in the lower right corner of the window. There you should use the "Limit Common Name" option, and write the user name into the text box. This prevents users to log in with their certificate but a different user name.
For this authentication type to work, you need to run a CA. An example with a portable CA implementation that runs on most operating systems is provided further below. To trust a CA, you can add its certificate in the hub manager. You can add multiple certificates if you have multiple CA. Adding CA certificates needs to be done only once for each hub, not for every user.
In the hub manager, you can also revoke certificates. This is useful if a user left the company but the certificate has not expired yet. This is also useful if the certificate got lost and a new one is needed. You can remove revoked certificates from the list once they're expired.
Note: The VPN server can operate as kind of a CA. You can create root certificates as well as certificates signed by said root. You should generally not do this, because the certificates have way too many permissions assigned to them. User certificates created by this system can be used to create and sign further certificates. This would allow user A to create and sign a certificate for user B, then log in as user B on the server.
RADIUS Authentication
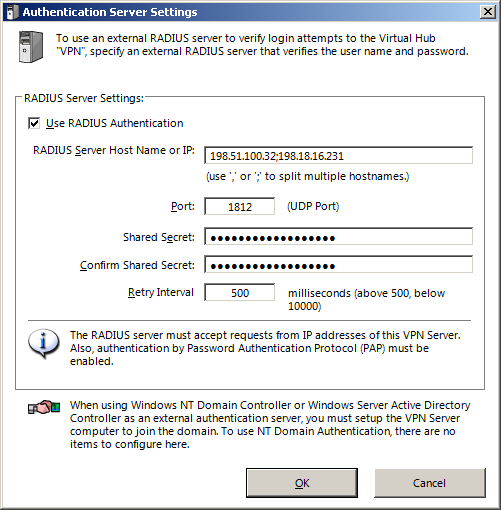
This authentication type uses a RADIUS server. To use this authentication type, you have to click on "Authentication Server Setting" in the hub properties and configure your server values.
The authentication server must accept connections from the VPN server. The protocol in use will be PAP (Password Authentication Protocol).
When using RADIUS for a user,
you can configure an alternative user name in the lower left corner of the dialog.
This is useful if the user name on the RADIUS differs from the VPN user name.
Setting a custom name is only available for regular users.
For the special * user, you can't specify an alternate name.
NT Domain Authentication
This authentication type uses a local NT Active Directory domain to authenticate users. This is likely the method of choice for an enterprise installation.
This method has no method for configuring servers and users. For this method to work, the VPN server itself must join the domain against which authentication is to be performed.
When using an NT domain for a user,
you can configure an alternative user name in the lower left corner of the dialog.
This is useful if the user name on the active directory differs from the VPN name.
Setting a custom name is only available for regular users.
For the special * user, you can't specify an alternate name.
Automatic VPN Accounts
The * user in combination with an NT domain
is a powerful method of automatomatically enabling VPN for all users in a domain.
Using this method, you don't have to worry about disabling accounts on the server
when users are removed and/or disabled in the NT domain.
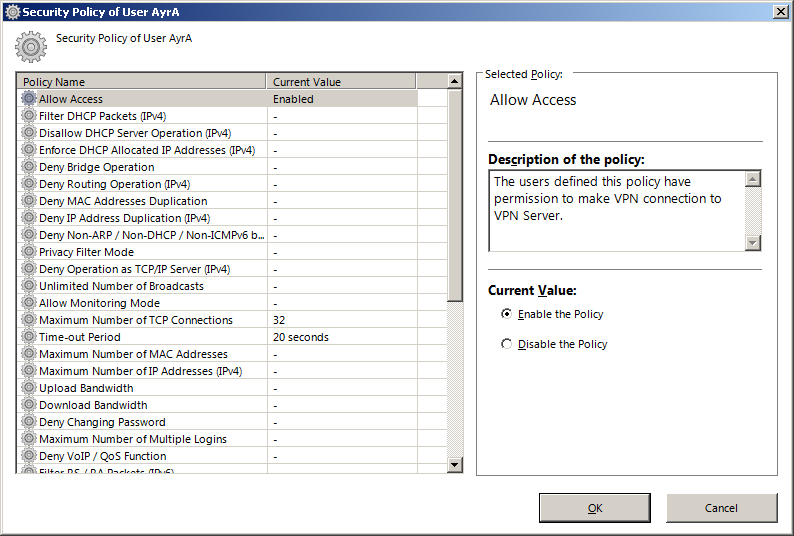
Security Policy
By default, users are not restricted in any way on the VPN server. They can do the same things they can do if they were on premise. The security policy can be used to restrict users. Policies can be applied to individual users and user groups. The available policies for users and groups are identical. In most cases, you want to apply basic policies to a group, then put all users into that group.
Recommended Restrictions
Security policies protect your network from misconfiguration but also malicious actions.
Policies (unless it doesn't makes sense) are usually on a per-session basis. Each policy has a description. Some policies might break applications that VPN users need.
Note: Most policies that have an "IPv4" in parenthesis at the end exist twice, once with "IPv4" and once with "IPv6". The policies will not be mentioned twice here but you almost always want to enable both.
- Disallow DHCP Server Operation
- Enforce DHCP Allocated IP Addresses
- Deny Bridge Operation
- Deny Routing Operation
- Deny MAC Address Duplication
- Deny IP Address Duplication
- Deny Non-ARP / Non-DHCP / Non-ICMPv6 broadcasts
- Filter RS / RA Packets
- Filter RA Packets
- Filter All Non-IP Packets
- No Default-Router on IPv6 RA
- No Default-Router on IPv6 RA (physical IPv6)
Optional settings
This chapter explains some policies you might want to define depending on your needs
Privacy Filter Mode
You want to enable this if you have people connect to this VPN that should not interact with other people on the same VPN. An example would be if the VPN is offered to your customers. You don't want them to detect other customers on the network. You might also want to enable this if the VPN is used to reach a data center.
Maximum Number of MAC Addresses
You normally want to limit this to one. It prevents the user from changing/injecting MAC addresses into the network.
Maximum Number of IP Addresses
Same as with the MAC address limit. Usually you want this to be set to one. It prevents the user from injecting IP addresses into the network or consuming many addresses from the DHCP server.
Upload Bandwidth & Download Bandwidth
You can define these policies if you expect many users and don't want them to consume too much bandwidth.
Deny Changing Password
Useful for accounts that are used for demonstrational purposes. This only has an effect for password based login. Users cannot change the RADIUS or NT domain password regardless of this policy setting.
Maximum Number of Multiple Logins
This limits the number of simultaneous logins a user can have. You want to set this to at least the number of devices the user uses. Recommendation: Set to one more than the user should ever simultaneously use. This avoids problems if the user lost his internet connection for a brief moment and tries to re-establish the VPN connection before the old one expired.
Deny VoIP / QoS Functions
This prevents a user from prioritizing his traffic. This WILL NOT prevent a user from using VoIP.
VPN Client Automatic Disconnect
Setting this to 86400 will disconnect connections that run for longer than 24 hours.
Filter All IPv6 Packets
If your network is not using IPv6, you can set this policy to avoid any problems with autoconfigured IPv6.
Backup and Restore
It's generally a good idea to create a backup of your server configuration. To do so, use the "Edit Config" button in the main window to back up and restore the configuration to a file.
Note: Be careful when you use this feature to copy the configuration from one server to another. Configuration that is bound to hardware (for example a bridged adapter) will likely not apply properly on another server. For the purpose of redundancy, consider using the "Clustering Configuration" in the main window instead.
Operating a CA
Operating a CA is recommended if you opt for certificate based authentication. This chapter explains how to do this with XCA. XCA is a CA that can run under all common operating systems and is fairly easy to operate.
Download
You can download XCA via Gitload. For Windows, there's an msi (installer) and a zip (portable).
Creating a Database
XCA can use common SQL servers as backend as well as SQLite file based database. For simplicity, this documentation focuses on the SQLIte method as it requires no other dependencies.
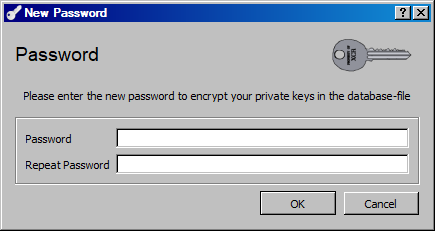
Create a new database in the file menu. You will be prompted to specify a file name, then you will have to enter a password to protect private keys. This should be very strong (20+ characters).
Creating the CA Certificate
Creating a CA certificate is simple.
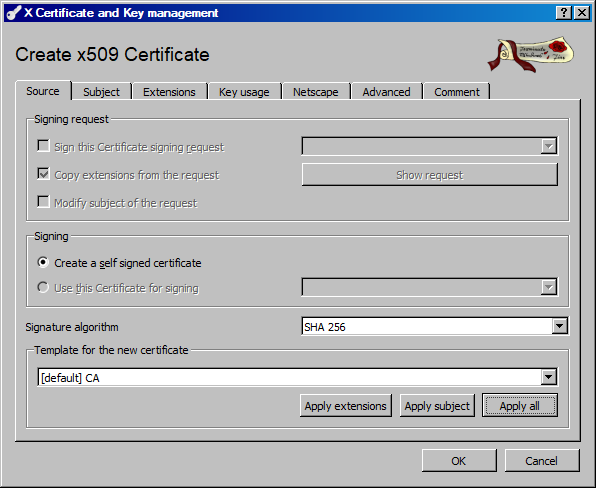
- In the "Certificate" tab of the main window, click on "New Certificate"
- Select the "CA" template in the lowest drop-down
- Click "Apply All"
- Fill out the fields in the "Subject" tab. Minimum is the "Internal Name" (this is how it's displayed in XCA) and the "commonName" (how it's displayed in the certificate).
- Click on "Generate a new key". Name the key any way you like (preferrably like the certificate) and select type "RSA" and size "4096 bit"
- Click on "Create" (this can take a few seconds)
- (Optional) In the "Extensions" tab, set the duration. 10 Years for a CA certificate is good but you can increase it if you want. You can optionally select "Midnight" to get a nicer timestamp.
- (Optional) If you plan on working with revocation lists, Use the "Edit" button next to the "X509v3 CRL Distribution Points" text box to set the URL where the revocation list will be available. This URL should be reachable by all software that comes in contact with the certificate.
- (Optional) Change the "Netscape Comment" field in the "Netscape" tab. The comment is part of the certificate, so don't enter any information you don't want to be public.
- Click "OK" to generate the certificate
Exporting the CA Certificate
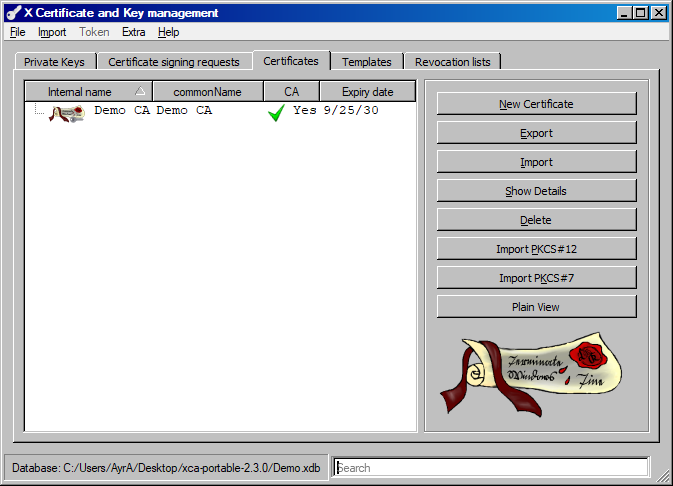
Select the CA certificate in the main window, and click "Export".
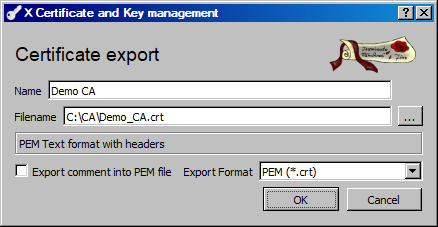
Change the name if you want to (this has no effect on the certificate) and select any path you like. Make sure the export format is set to "PEM (*.crt)"
The CA certificate is public information. It's usually a good idea to have this certificate present in an easily accessible location, for example a web server.
Using the CA Certificate
This certificate can now be imported into the VPN server and the VPN client.
On the server, you can import it in the hub manager. You have to import the certificate into every hub you want it to be valid for, using the "Trusted CA Certificates" button.
On the client, press CTRL+R or select the appropriate option in the "Tools" menu of the client manager. Importing the certificate is optional but it avoids a security prompt for when the user makes the first VPN connection.
Creating the Server Certificate
The server certificate is used for clients to ensure that they are talking to the appropriate machine.
- Use the "New Certificate" button
- In the "Source" tab, make sure your CA certificate is selected in the "Signing" box.
- Select the TLS_server template and click "Apply all"
- In the "Subject" tab, fill out all values you want. The "commonName" value should be the domain name that you're going to assign this VPN server. If you want to work with IP addresses only, use the internal host name instead.
- Don't forget to generate another private key in the lower part of the tab. Use the same type and size parameters as you did for the CA certificate.
- In the "Extensions" tab you can again configure different certificate settings. Be aware that TLS certificates that are longer than one year will no longer be accepted by modern browsers.
- If the certificate should be valid for more than one domain name, or should be valid for IP addresses, use the "Edit" button next to the "X509v3 Subject Alternative Name" box to add additional entries. If you add at least one entry, make sure the "Copy Common Name" box is checked. It should be as it's part of the template you applied.
- Click "OK" to create the certificate
Using the TLS Certificate
The TLS certificate can now be imported into the VPN server. To do so, you need to export the certificate and the key. Exporting the certificate is identical to exporting the CA certificate, so check the chapter above.
Exporting the key is almost identical. Select the key that matches your certificate in the "Private Keys" tab adn click "Export". Enter a name and a path. Make sure the format is "PEM private (*.pem)" and click "OK"
Now on the server, import the certificate in the server manager (not the hub manager) using the "Encryption and Network" button.
Creating the VPN Template
It's a good idea to create a template for VPN user certificates. When the first certificate expires and you have to issue a new one, you will likely have forgotten the original settings, so a template will help in that regards.
Templates can be changed at any time, but be aware that this will not change the contents of already issued certificates.
Using a Pre-made Template
Copy all the code in the box below, then in the "Templats" tab, right click into the empty area and select "Paste PEM Data", then "Import All". Note: The "Internal Name" will be empty, you can double click the template after importing it and assign it a name. The name is displayed in the "Template" drop down box whenever you create a certificate. The pre-made template has all the proper key usages already selected.
-----BEGIN XCA TEMPLATE-----
AAADUAAAAAowAAAAABsAAAAMAHYAYQBsAGkAZABOAAAAAgAyAAAAEgB2AGEAbABp
AGQATQBpAGQAbgAAAAIAMAAAAAwAdgBhAGwAaQBkAE0AAAACADIAAAAMAHMAdQBi
AEsAZQB5AAAAAgAxAAAAFABzAHUAYgBBAGwAdABOAGEAbQBlAAAAAAAAAB4AbgBz
AFMAcwBsAFMAZQByAHYAZQByAE4AYQBtAGUAAAAAAAAAHgBuAHMAUgBlAHYAbwBj
AGEAdABpAG8AbgBVAHIAbAAAAAAAAAAYAG4AcwBSAGUAbgBlAHcAYQBsAFUAcgBs
AAAAAAAAABIAbgBzAEMAbwBtAG0AZQBuAHQAAAAUAFYAUABOACAAQwBsAGkAZQBu
AHQAAAAUAG4AcwBDAGUAcgB0AFQAeQBwAGUAAAACADUAAAAaAG4AcwBDAGEAUABv
AGwAaQBjAHkAVQByAGwAAAAAAAAAIgBuAHMAQwBBAFIAZQB2AG8AYwBhAHQAaQBv
AG4AVQByAGwAAAAAAAAAEgBuAHMAQgBhAHMAZQBVAHIAbAAAAAAAAAAoAG4AbwBX
AGUAbABsAEQAZQBmAGkAbgBlAGQARQB4AHAARABhAHQAZQAAAAIAMAAAABQAawB1
AEMAcgBpAHQAaQBjAGEAbAAAAAIAMAAAAAwAawBlAHkAVQBzAGUAAAAEADIAOQAA
ABQAaQBzAHMAQQBsAHQATgBhAG0AZQAAAAAAAAAWAGUAawB1AEMAcgBpAHQAaQBj
AGEAbAAAAAIAMAAAAA4AZQBLAGUAeQBVAHMAZQAAADQAZQBtAGEAaQBsAFAAcgBv
AHQAZQBjAHQAaQBvAG4ALAAgAGkAcABzAGUAYwBVAHMAZQByAAAADgBjAHIAbABE
AGkAcwB0AAAAAAAAAAQAYwBhAAAAAgAyAAAAFABiAGMAQwByAGkAdABpAGMAYQBs
AAAAAgAxAAAAEgBiAGEAcwBpAGMAUABhAHQAaAAAAAAAAAAOAGEAdQB0AGgASwBl
AHkAAAACADAAAAAUAGEAdQB0AGgASQBuAGYAQQBjAGMAAAAAAAAADgBhAGQAdgBf
AGUAeAB0AAAAAAAAABQATwBDAFMAUABzAHQAYQBwAGwAZQAAAAIAMA==
-----END XCA TEMPLATE-----
Creating a VPN Client Certificate
This process is very similar to the TLS certificate
- Select "New Certificate" in the "Certificates" tab.
- In the "Source" tab, select your CA certificate in the "Signing" box
- Apply your VPN client template (use "Apply All")
- In the "Subject" tab, give the certificate an internal name, and write the VPN user name into the "commonName" field
- Create a 4096 bit RSA key for this certificate
- In the "Extensions" tab, change the duration as needed. Note, that when the certificate is about to expire, you have to create a new one for continued VPN access by this user. Don't set the duration too short or you will end up having to issue lots of certificates. The provided template uses 2 years. The certificate validity period is a good method to grant someone access for a limited time only.
Using the Client Certificate
The client certificate can be supplied as authentication mechanism in the VPN client. Check the chapters below for how to configure the client and how to distribute pre-made settings for your users.
Working with Signing Requests
A proper CA never comes into contact with the private key of the user certificates. This reduces the chance of key compromise, but it depends on the user to retain a copy of the key and to generate a signing request.
Creating a Signing Request
One of the easiest ways to create such a request is using OpenSSL. The user has to use these two commands to create a private key and a request. The request (not the private key) is to be sent to you. The request command will ask the user various questions. None of the information is really important as we can override them on the CA.
openssl genrsa -out private.key 4096
openssl req -new -key private.key -out request.csr
Using a Signing Request
After the request has been sent to you, you can import it in the "Certificate signing requests" tab. The request will then appear in the list as "Unhandled"
To convert the request into a certificate, right click the request and select "Sign"
This brings up the certificate creation window. The top part has the signing request filled in.
- Deselect the "Copy extensions from the request" checkbox
- Select the "Modify subject of the request" checkbox
- Select your CA certificate in the "Signing" box
- Apply the VPN client template. Use the "Apply extensions" button only if you want to preserve the "Subject" data from the signing request.
- In the "Subject" tab, correct any misinformation. Make sure the "commonName" field exactly matches the VPN user name.
- Check any other tabs and make changes as you deem appropriate.
- Click "OK" to sign the certificate.
Note: Apart from the public key, any value from the signing request can be overridden by you.
After signing, the request will appear as "Signed" now.
The certificate can be exported and sent to the user.
Note: You can't export the private key, since there is none.
The user is already in possession of the key.
You can delete the signing request once you are done, but there is no real reason to do so because it serves as kind of a history.
Using RSA Public Keys
Instead of using a signing request (as it is done for a proper CA),
you can also just use public keys.
The user has to type these two commands
and send you the pub.key file:
openssl genrsa -out private.key 4096
openssl rsa -pubout < private.key > pub.key
To import the key, copy the contents of the file to the clipboard, then use the "Import PEM Data" context menu option in XCA to import the key.
After that, create the certificate as you would with an RSA private key. The difference is that instead of generating a key, you select the imported key.
VPN Client
This chapter explains the installation and configuration of the VPN client. You only need to do this if you want to use the SoftEther protocol.
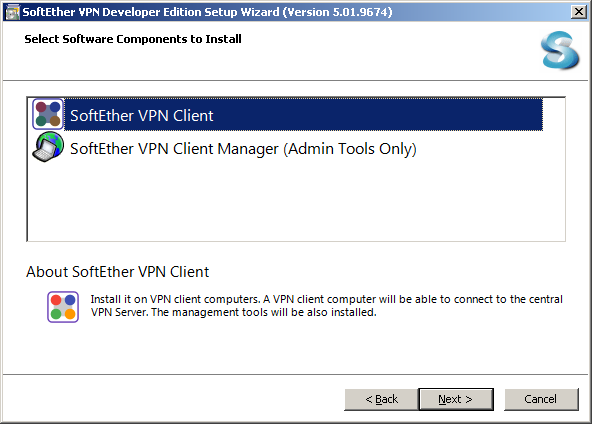
Installation
The installation is pretty straight forward. Unless you require a custom installation path, you can install the client using default settings.
The client can (like the server) be administered remotely. In that case, you can install the remote administration tools instead. Be aware that remote administration is disabled by default in the client and has to be enabled in the "Tools > Options" menu
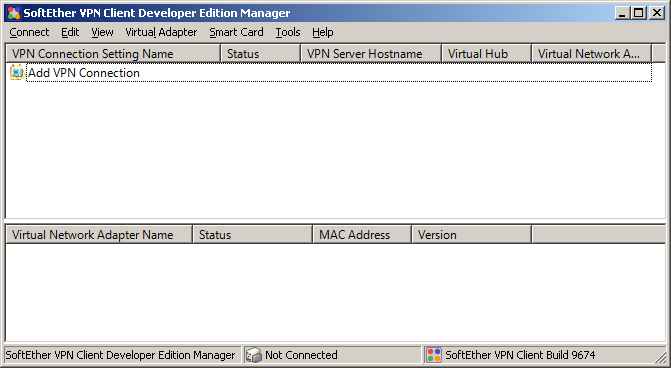
Initial Configuration
The client needs a virtual network adapter to perform VPN operations. When you create yorur first VPN connection, you will be asked to create an adapter. You can also at any time create an adapter in the "Virtual Adapter" menu. Up to 128 adapters can be created.
When you create an adapter, use the default "VPN" name. If you want to manage multiple clients or distribute VPN connections automatically, be sure that the adapter name is identical on all machines.
Resetting Adapters and IP
If your operating system resets some network settings,
it might also reset the priority (metric) of the adapter.
If you find that VPN connections are opened without issues,
but they're not used by your machine,
check that the network card metric is set to 1,
and if it's not, set it to that value.
Consult the instructions for your operating system on how to do this.
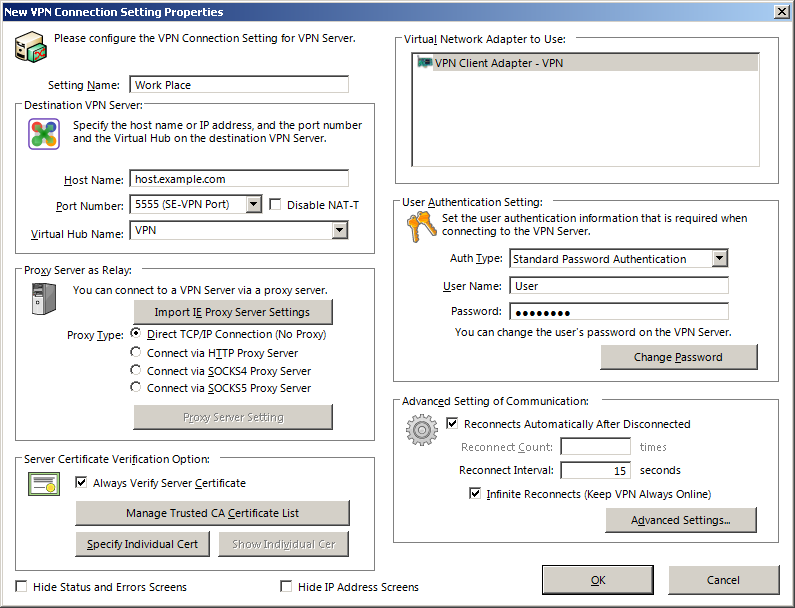
Managing VPN Connections
You can create a new VPN connection using the top entry in the list, or the "Connect" menu item.
You will then be required to fill in a few entries. They depend on how your server was configured. You want to enter a setting name and a host name. The port 443 is usually OK but if your VPN server is shared with a web server, another port can be chosen from the drop down list, or you can enter a port manually. Note that SoftEther listens for all protocols on all ports. The names in parenthesis are mere suggestions of what the port is usually for. The client will always use the SoftEther protocol.
When you leave the host name and port field, the client tries to automatially query the server for hub names. If you opted to hide hubs from anonymous users, you have to write in the name manually.
Below the host name you can configure a proxy server in case you need to use one.
Below the proxy settings are the certificate settings. For your own security, you should enable certificate verification. You can now either supply the root certificate that will be used to sign the server certificate, or you can supply the server certificate directly. Specifying a CA certificate is usually better because otherwise you have to supply a new certificate every time the old one expires or is replaced for other reasons.
On the right side you can pick the VPN adapter. There's usually only one in the list. If you want to open multiple VPN connections simultaneously, you have to assign each one a different adapter.
Below the adapter settings are the user authentication settings.
Select the method of choice and supply the required information for that method.
If you use password authentication, you can also change the password here.
Note: You can't change external passwords (from RADIUS or NT domain).
Below the user settings are advanced settings. You almost never want to change anything there.
Deploying VPN Connections
The best way to depoly VPN connections is to use remote control for the client. This is explained further below. As an alternative, you can create and configure a VPN connection the way you want it, then right click the entry in the VPN list and export it. You can then import it into another client using the "Connect" menu.
This will not export/import the CA list (see "Tools" menu or press CTRL+R)
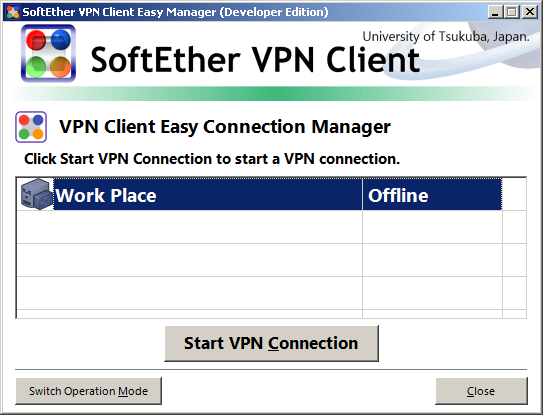
Restricting the Client
In a work environment you might want to restrict the VPN client. To do so, use "Tools > Switch Operation mode"
In most cases, you want to switch to "Easy Mode" to not overwhelm the user. Enable the setting locker and enter a secure password.
Switching to easy mode is not required, and users can switch back to the normal mode at any point. They will not be able to add/edit/delete VPN connections until they confirm the password and disable the setting locker.
A shortcut can be placed on the user desktop to make connecting to the VPN even simpler.
A VPN connection can be set as "startup connection" in the context menu. This makes the VPN connect automatically at system start before the first user logs in.
Remote Management
The VPN client, like the server, can be managed remotely. This should only be enabled if remote management is desired, for example in a corporate environment.
Installing Remote Tools
The remote administration tools are part of the regular VPN client installer. You only have to install them if you don't have the VPN client itself installed locally. The remote administration tools are installed together with the regular client installation. You don't have to install the tools on the client that is being remotely connected to.
To create a shortcut for remote management,
duplicate the regular VPN client desktop shortcut,
and add /remote to the command line.
Enabling Remote Management
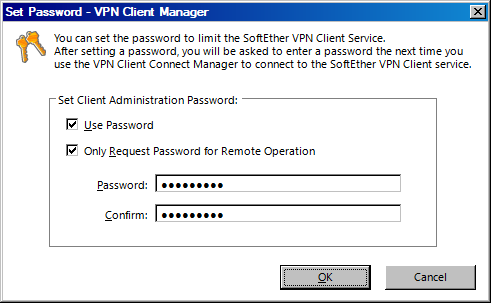
In the client, go to "Tools > Options" and check the "Allow Remote Management of VPN Client Service" checkbox, then click "OK"
After enabling remote management, press CTRL+P (or use the appropriate "Tools" menu option) to set a password. Check the checkbox to use the password, and optionally to only require the password for remote management. If you don't check the second checkbox, you have to enter the password each time you start the client.