Back to List
You are viewing an unformatted version of this file.
To get the formatted version, you have to enable JavaScript.
# Running Apache on Windows
This document explains how to run an Apache Webserver with PHP on Windows as a Service.
Setup Time is about 30 minutes
## READ FIRST
If you just want to experiment using PHP and MySQL,
I recommend you get [USB Webserver](http://www.usbwebserver.net/webserver/) instead.
It's a free and portable application.
## Tasks
These tasks will be performed:
1. Installing MySQL (optional)
2. Installing PHP
3. Installing Apache
4. Configuring Apache as Service (optional)
5. phpMyAdmin (optional, requires step 1)
6. Locking out Bots (optional)
7. TLS Certificate (optional)
## Omissions
This guide will not include certain topics:
- Port Forwarding
- Setting up a Website
## Requirements
This guide was written for Windows 7 Professional.
Some features might not be available on home/other editions/versions of Windows.
## Step 1: Installing MySQL
**This step is optional, but most PHP sites will eventually need a MySQL server**
Install MySQL using Default settings.
You can find a detailed guide in the [Throwaway E-mail](#mail_server) documentation.
### Securing the SQL Server
This server will serve requests to people that want to break things.
It's recommended that you create individual MySQL users
for every page you write/install on your webserver.
These users should have only minimal access to the database.
## Step 2: Installing PHP
Go to [windows.php.net](https://windows.php.net/qa/) and download the version you prefer.
Usually the newest non-beta version is OK.
As of this writing, that would be 7.3.
- Download the 64bit version if your Windows is 64 bit too.
- Download the version marked as "Non Thread Safe"
### Installer
PHP is a "standalone" application.
There is no installation needed.
For now, just extract it into a folder on your desktop.
You can test this by executing `php -r "echo 1+1;"` in the command line.
It should reply with `2` and then exit.
If you can't launch `php.exe` you might be missing the Visual C++ 2015 Runtime.
### Configuration
Duplicate the file `php.ini-development` and name the new file `php.ini`.
You can also use the file `php.ini-production` instead,
but be aware that this has almost all error reporting set to disabled.
This means that you will just stare at blank pages if something is messed up.
Open your new `php.ini` and change these values (use search function to find them):
Name | Description
----------------------------------|-------------
`max_execution_time` | Number of seconds a script can run before it is aborted. Don't set too high. If you have a single script that has to run for a long time, you can reset the timer during execution.
`memory_limit` | Maximum memory for a single script. The suffix `G` is allowed too. Use at least 4 times as much memory as you allow for `post_max_size`
`error_reporting` | Errors that are reported. You can disable some of those but it's good practice to set it to `E_ALL`
`display_errors` | Set to `On` while developing to get error messages that happen at runtime
`display_startup_errors` | Set to `On` to get startup error messages. This catches some more serious syntax errors.
`html_errors` | If set to `On` the error will be formatted using some HTML tags to look better on websites
`post_max_size` | Increase this number if you want to implement file uploads.
`upload_max_filesize` | Increase this to the same number as `post_max_size`.
`max_file_uploads` | This is up to you how many files you want to accept at once.
`user_agent` | If you plan on making web requests with PHP you want to set a proper header, something like `PHP/7.3;+http://your-domain-here.example`. This is not necessary but it's nice for others to see where automated requests come from.
`session.save_path` | Set to `"2;C:\Apache\sessions"` (including the quotes)
`session.cookie_httponly` | Set to `Yes` for added security. This makes the cookie invisible for browser scripts and prevents some session steling attacks.
`session.hash_bits_per_character` | Make sure this **is not** `6`. Using `5` is recommended.
#### Comments
Some of the settings you might want to change start with `;`.
This symbol indicates a comment. You have to remove it in order to activate that setting.
To visualize this better, use [Notepad++](https://notepad-plus-plus.org/download/)
to edit the `php.ini` file as it has santax highlighting.
#### Dynamic Extensions
The Section "Dynamic Extensions" in the ini file allows you to load components into PHP.
It's important to note that every component slows PHP down a bit during startup.
Only enable what you need.
In any case, search for `extension_dir` and set it to `C:\Apache\cgi-bin\php\73\ext`.
Some useful extensions:
- **mysqli**: Required for MySQL interaction
- **mbstring**: phpMyAdmin prefers if this is enabled. Required for proper Unicode string handling
- **bz2**: phpMyAdmin prefers if this is enabled. Required for downloading database data in compressed form.
- **openssl**: Required to encrypt and decrypt stuff. This is **NOT** needed to serve PHP pages over TLS
- **sockets**: Allows you to open network sockets to interact with services on the internet
## Step 3: Installing Apache
### Download
Go to [apachehaus.com](https://www.apachehaus.com/cgi-bin/download.plx)
and download the version of apache you want.
Be sure to download the 64 bit version for 64 bit Windows.
It's usually one of the top two download links.
The Visual C++ runtime can be found on the bottom of the page.
Note: Multiple Apache versions are offered. Be sure you download the runtime that matches your version.
If your Apache was compiled with the 2015 Runtime, installing the 2017 Runtime will not get it to work.
### Installation
The archive contains a single directory.
As of this writing, it's named `Apache24`.
Extract the contents of this directory, not the directory itself, to `C:\Apache`.
If you've done this correctly, the file `C:\Apache\bin\httpd.exe` exists.
#### PHP
Copy your extracted PHP directory to `C:\Apache\cgi-bin\php\73`.
If you've done this correctly, the file `C:\Apache\cgi-bin\php\73\php.exe` exists.
Create the directory `C:\Apache\sessions`
Save the file `create.bat` with this content in it:
```bat
@ECHO OFF
SETLOCAL
SET TOKENS=0 1 2 3 4 5 6 7 8 9 a b c d e f g h i j k l m n o p q r s t u v
FOR %%I IN (%TOKENS%) DO (
IF NOT EXIST %%I MD %%I
ECHO %%I
FOR %%J IN (%TOKENS%) DO (
IF NOT EXIST %%I\%%J MD %%I\%%J
)
)
ENDLOCAL
```
Run that file to create the directory structure.
You can delete it after you're done.
#### Configuration File
Replace `C:\Apache\conf\httpd.conf` with [this version](data/httpd.conf).
Open the file and fill in the values for `ServerAdmin` and `ServerName`.
The `ServerAdmin` should be a valid E-mail address.
This is shown on error pages and used for TLS certificates.
`ServerName` should be your domain name this server runs on, followed by `:80`.
If you don't have a domain name,
go to [ip.ayra.ch](https://ip.ayra.ch) and use that IP address instead.
**Note**: A domain name is required if you want to serve your page over TLS,
which is recommended.
If you plan on setting up TLS, check out the "TLS certificate" chapter at the bottom.
### Testing
1. Delete the entire content of `C:\Apache\htdocs`
2. Create a file `index.php` in this directory with the content ``
3. Run `C:\Apache\bin\httpd.exe`
4. Go to [localhost](http://localhost)
You should see your PHP version information.
If you don't see it or if the server refuses to start,
check the `error.log` file in the logs directory.
Be sure to close the `httpd.exe` window before continuing below,
otherwise the service will refuse to run.
## Step 4: Configuring Apache as Service
**This step is optional. You can run `httpd.exe` manually every time you want to use your server if you prefer**
Configuring Apache as a service is not necessary but allows it to run without you being logged into the system.
It also allows it to run under a different user,
which prevents successful hackers from accessing your user profile or change system settings.
### Creating a User
Open a command line as administrator and run these two commands:
NET USER Apache Apache /ADD
NET LOCALGROUP Users Apache /DELETE
### Setting Permissions
The user we created needs permissions to access the Apache folder,
but for security reasons we should not grant it write permissions on the entire folder.
#### Base Folder
1. Right click on the `C:\Apache` folder, select "Properties" and go to the "Security" tab
2. Click on "Edit...", then "Add..."
3. Enter "Apache" into the field and select "OK", do not modify any of the permission checkboxes
4. Click "OK" again twice to exit the Properties dialog

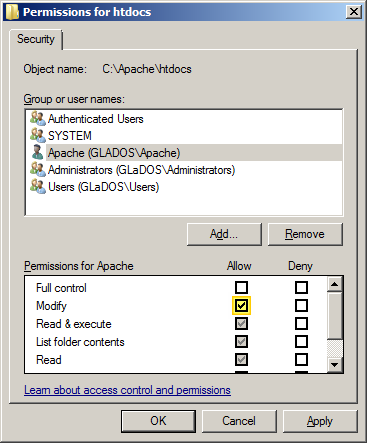
#### Sub Folders
**These steps are slightly different**
1. Right click on the `C:\Apache\logs` folder, select "Properties" and go to the "Security" tab
2. Click on "Edit..." and select the "Apache" user from the list
3. Select the checkbox for "Modify" in the column "Allow"
4. Click "OK" again twice to exit the Properties dialog
5. Repeat Steps 1-4 for `C:\Apache\htdocs`, `C:\Apache\temp` and `C:\Apache\sessions`
### Installing Service
1. Open an administrative command prompt and type `C:\Apache\bin\httpd.exe -k install`
2. Create a shortcut for `C:\Apache\bin\ApacheMonitor.exe` in your Startup folder.
To reach that folder, open start menu, right click on the "Startup" folder and select "Open"
Alternatively, open the "Run" window and go to `shell:startup`.
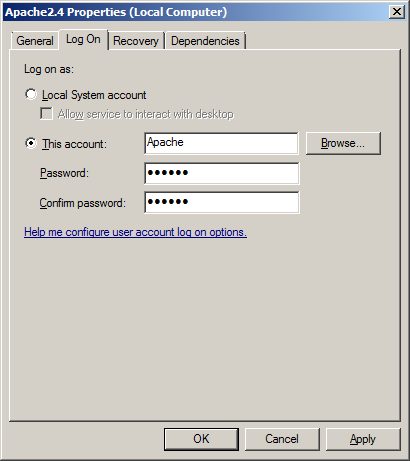
3. [Run](#run) `services.msc` and find the "Apache" service. It will not be exactly named this but end in the version number.
4. Double click the "Apache" entry, select the "Log on" tab and select "This account"
5. Fill in "Apache" into all text boxes. Be sure you use the proper case.
6. Click "OK". The first time you do this, a message box will inform you that .\Apache" got additional permissions assigned.
7. Start the Service
8. Test using [localhost](http://localhost) again
## Step 5: phpMyAdmin
**This step is optional, it's unnecessary if you don't use MySQL**
phpMyAdmin is used to manage your MySQL server.
It's not necessary to access the server but is merely a management tool.
### Download and Installation
1. Download the latest version from [phpmyadmin.net](https://www.phpmyadmin.net/).
2. Extract it as `C:\Apache\htdocs\pma`. If you do this correctly, the file `C:\Apache\htdocs\pma\README` exists.
3. Go to [localhost/pma/](http://localhost/pma/).
4. Log on using "root" and your MySQL root password.
5. At the bottom will be a hint that a storage is not configured. Click the "Find out why" link and create the storage.
#### Optional Steps
Go to [localhost/pma/setup/](http://localhost/pma/setup/) to configure the phpMyAdmin installation the way you like.
The setup will not write a config file for you.
On the "Overview" tab there is a "Diaplay" link, which you can use to copy the file contents.
Save it as `config.inc.php` in your phpMyAdmin directory.
### Securing
Open a command prompt and type
ECHO Require all denied>>C:\Apache\htdocs\pma\.htaccess
ECHO Require local>>C:\Apache\htdocs\pma\.htaccess
Your phpMyAdmin installation can now only be used from your own computer via `http://localhost`.
## Step 6: Locking out Bots
**This step is optional but recommended**
You can lock out bots using multiple ways.
Ideally you combine them all together.
### Robots.txt
Create the file `C:\Apache\htdocs\robots.txt` with this content:
# No Benefit at all to us
User-agent: AhrefsBot
Disallow: /
User-Agent: Mediatoolkitbot
Disallow: /
# Random SEO Bots we don't benefit from
User-agent: spbot
Disallow: /
User-agent: ezooms
Disallow: /
User-agent: sistrix
Disallow: /
Only "good" bots will use and respect this file.
You can fnd more bots [in our robots.txt](https://cable.ayra.ch/robots.txt)
### User Agent
Create the file `C:\Apache\htdocs\.htaccess` with this content:
#Banned Bots
RewriteCond %{REQUEST_URI} !^\/robots\.txt$ [NC]
RewriteCond %{REMOTE_ADDR} !^127\.0\.0\.1$ [NC]
RewriteCond %{HTTP_USER_AGENT} (Mediatoolkitbot|AhrefsBot|ltx71) [NC]
RewriteRule .* / [F,END]
#No/Short User Agent
RewriteCond %{REQUEST_URI} !^\/err\/ [NC]
RewriteCond %{REMOTE_ADDR} !^127\.0\.0\.1$ [NC]
RewriteCond %{HTTP_USER_AGENT} ^(.{0,20})$
RewriteRule .* / [F,END]
This will block certain bots completely and also blocks access by tools that send a very short or no "User-Agent" header.
You can add more bots to the list if they bother you.
### Range Block
Many bad bots run on infrastructure that is for rent.
Check out [AmazonBlock](https://github.com/AyrA/AmazonBlock) if you are interested in blocking these ranges.
1. Click on "Releases" to download a precompiled version.
2. Save it as `C:\Tools\AmazonBlock\AmazonBlock.exe`
3. Download [this xml file](data/AmazonBlock_Update.zip) and extract into the same directory
4. [Run](#run) `taskschd.msc` and click on the folder "Task Scheduler Library"
5. Right click onto the Task list itself and select "Import Task..."
6. Select the xml file you just extracted.
7. Right click the newly created task and run it.
8. [Run](#run) `WF.msc` and check for Amazon rules under "Inbound"
## Step 7: TLS Certificate
To enable HTTPS with certificates, uncomment the 3 commented modules in the example configuration.
Then head down to the line that starts with `MDomain` and change it to match your domain.(s).
At the end of `ssl.conf` you can add virtual hosts for each of the MDomain lines like this:
ServerName first.domain.here.example
SSLEngine on
DocumentRoot "${SRVROOT}/htdocs"
Change the path as needed. Keep adding entries to match the unencrypted `VirtualHost` entires.
The MD module will then request and assign a certificate to those entries.
The certificate is only activated **after** you restart the Apache server once.
You can check the error.log file for any problems and status information.
If the certificate was successfully requested,
you can check your local status page (`http://127.0.0.1/server-status`)
if you included the status page configuration (it's not enabled by default).
At the very bottom you should find a list of certificates.