# Your own throwaway E-Mail Domain
This document explains how you become your own throwaway provider completely free of charge.
No need to buy a domain name or pay for a static IP address with this setup.
Of course you can use this guide to set up your personal E-Mail system for a real domain,
but it will not include the stuff needed to send E-mails.
If you are interested in sending mails,
the requirements to send E-Mails are outlined [in this help article](#mail_server_checklist).
## Pros
- You are not in any blacklist
- Full control over your data
- Access with your E-mail client
- No need to remember addresses at all
- Easy repeated signup for time limited free services
## Cons
- The mail computer needs to be online to get messages
- No ability to send messages
- Setting this up is somewhat time consuming. Reserve about 2 hours to fully do this.
## Prequisites
- A computer running Windows 7 or newer.
This doesn't requires a beefy machine at all. Can be an old computer or the one you work with normally.
Doesn't even needs to be real hardware. A VM with direct access to your network card (bridge network) works fine.
- A publicly acessible Port 25. This usually means you need a router with port forwarding.
Ideally you have some experience with installing services and configuring your router.
## What we will do
1. Obtaining and configuring a dynamic DNS name
2. Setting up automatic IP tracking for said domain name
3. Installing MySQL
4. Installing hMailServer
5. Configuring Mail Server
6. Firewall and Port forwarding
7. E-Mail client
## Step 1: The Domain
Go to a dynamic DNS provider that supports MX records and register a free dynamic DNS name.
[No-IP](https://www.noip.com/) is a provider that does.
Pick any domain that you are comfortable with as the end of your address.
Be sure to set an MX record. As name you want to add your full domain name.
The priority doesn't matters, you can just use `1`.
**Example:**
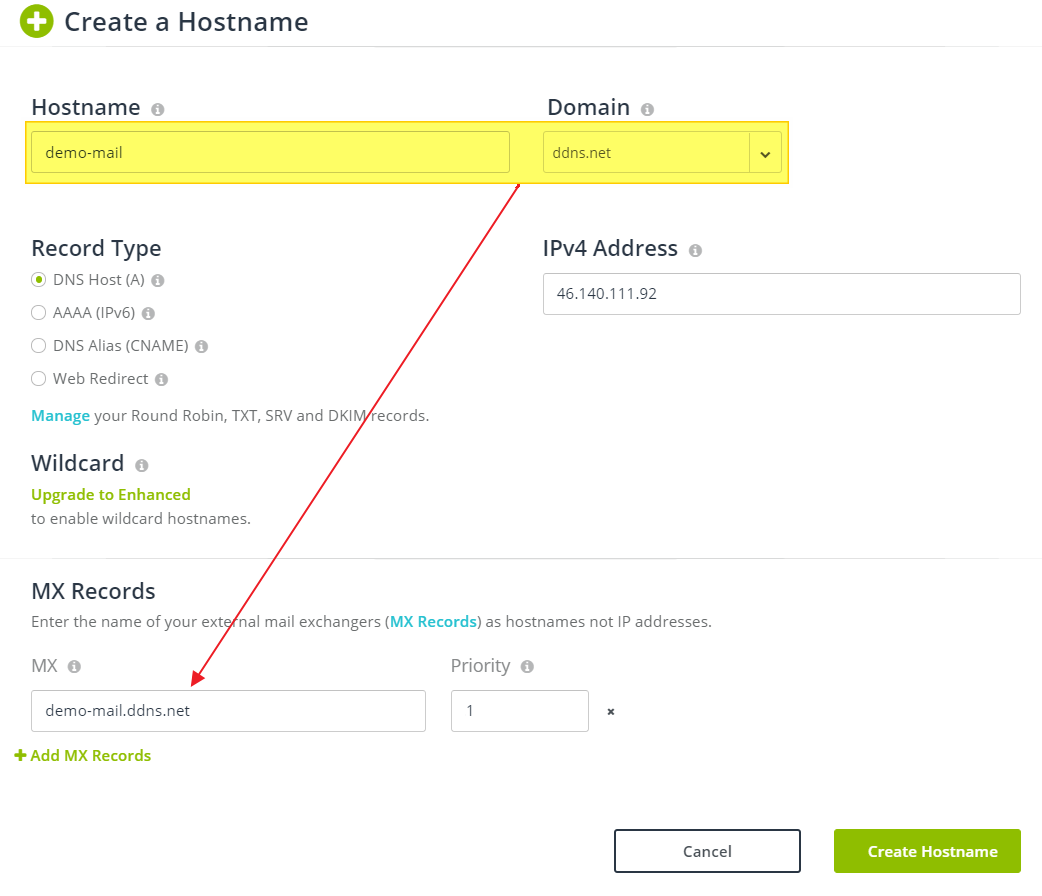
The IP address is normally already prefilled into the field.
If the provider offers a type `A` and a type `AAAA`, pick `A` if your IP is in the format `W.X.Y.Z`,
use `AAAA` otherwise.
## Step 2: Keeping the name up to date
You can keep your name up to date in two ways:
### Update client (recommended)
Most providers provide update clients.
This is generally the recommended method since your mail machine needs to be running anyways for the domain to work.
The client can usually be found somewhere in your account.
In the case of No-IP, [click here](https://my.noip.com/#!/dynamic-dns/duc)
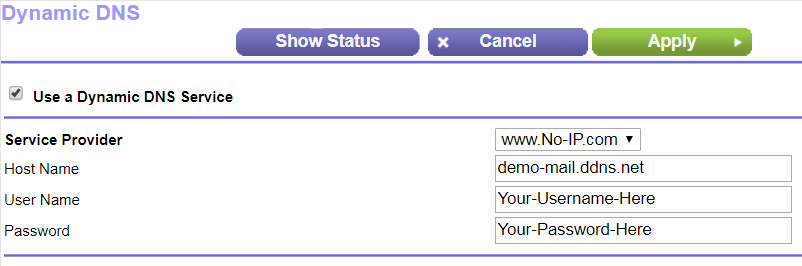
### Router
Most routers support the common dyamic DNS providers
Log into your Router web console.
If you don't know your router IP, [Run](#run) the command `cmd.exe /k ipconfig | find "way"`
To log in, you need a username and password. Check the label on the router if it's written on there,
if not you can try common combinations or search for `<your_router_model> default password`.
**Common combinations:**
- Username: `admin`, `administrator`, or none
- Password: `admin`, `1234`, `123456`, `12345678`, `00000000`, or none
Once you are logged in, search for a setting that is usually named "Dynamic DNS"
## Step 3: MySQL Server
**THIS CHAPTER IS COMPLETELY OPTIONAL**
If you don't want to mess with an SQL server and just want to get it working,
you can skip this chapter and go straight to Step 4. Do not pass Go. Do not collect $200.
### Requirements
#### .NET Framework
The setup needs the [.NET framework 4.5.2](https://www.microsoft.com/en-us/download/details.aspx?id=42642).
You need to install that first.
Closely check the list of supported operating systems.
Some of them require certain service packs.
This is already installed if you do updates on a regular basis.
If you are not sure if you need this, just try running the MySQL installer, it will tell you if it's missing.
#### Visual C++ Redistributable
[Download it from Microsoft here](https://www.microsoft.com/en-us/download/details.aspx?id=48145).
Eventually you can select the x64 and the x86 version.
I recommend you take both versions unless your Windows is only 32 bit.
### Download
[Download MySQL Community Edition](https://dev.mysql.com/downloads/mysql/).
Go to the linked page, scroll down and download the Windows installer.
You will be redirected to a page that offers two installer versions, a small one and a big one.
The installers are identical.
The smaller version needs to download what the larger already contains.
I recommend using the smaller version because you don't need everything.
The final download page asks you to log in but there is a link below that allows you to continue without.
### Installation
Run the installer and if offered to chose the setup type you can click "Server only" and continue installation.
The installer eventually asks you a few things. Answer them according to this document.
Some pages mentioned here might be missing for you, in that case just skip that chapter.

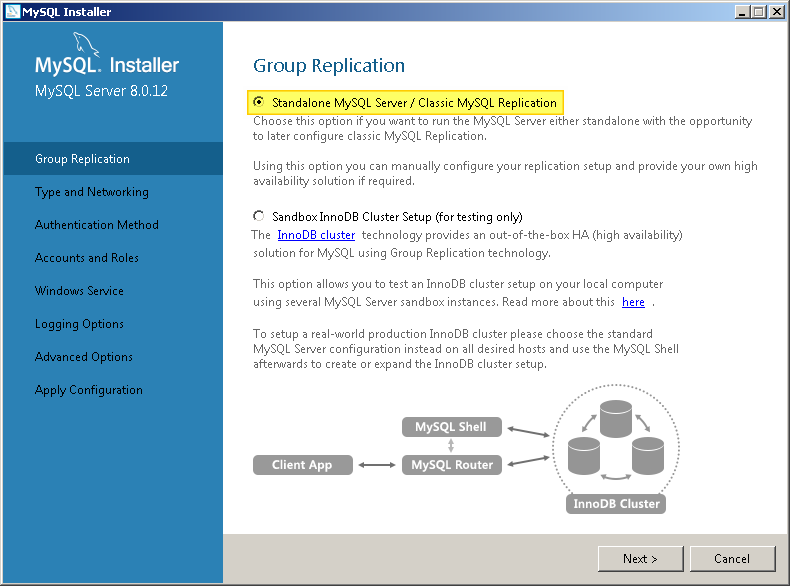
#### Group Replication
- Chose "Standalone MySQL Server"
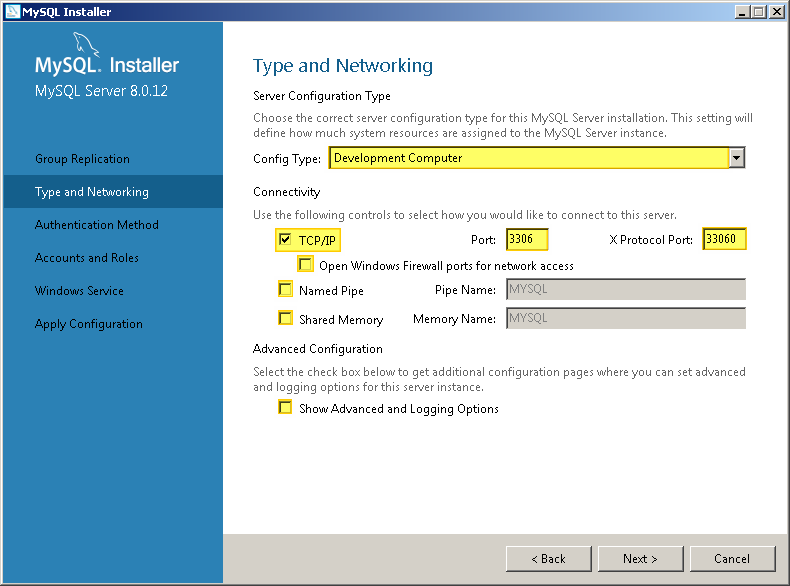
#### Type and Networking
1. Chose type "Development Computer"
2. Check "TCP/IP"
3. Use Port `3306`
4. Use X Protocol Port `33060`
5. Uncheck "Open Windows Firewall ports for network access"
6. Uncheck "Named Pipe"
7. Uncheck "Shared Memory"
8. Uncheck "Show Advanced and Logging Options"
**Note** You can enable advanced options but we will not be making any changes to the pages that appear.
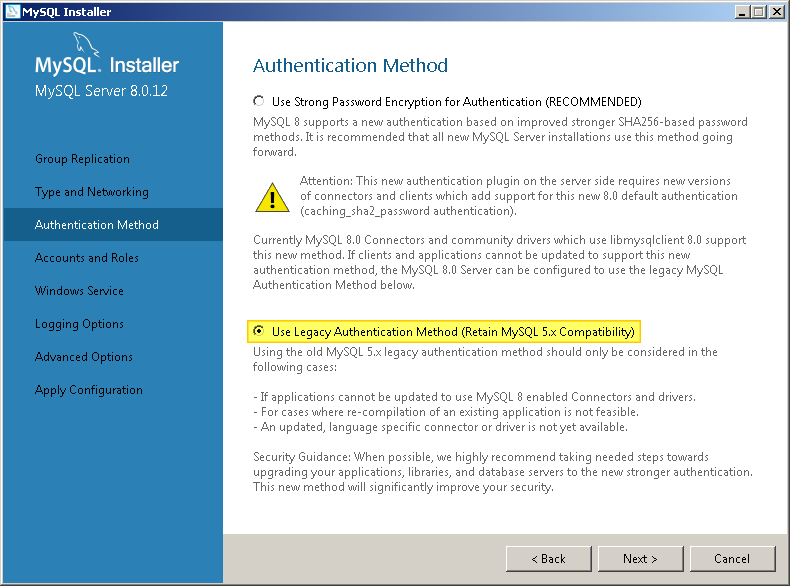
#### Authentication Method
- Select "Use Legacy Authentication Method"
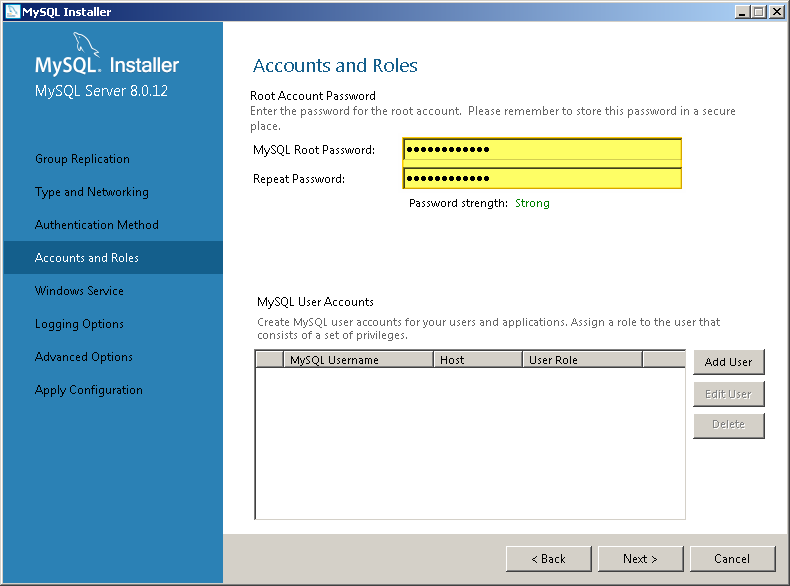
#### Accounts and Roles
- Enter a root password
- Repeat the root password
**Note**: Chose a password that you can remember or write it down.
If you lose it you can't access this instance any longer.
There is no built-in password recovery on a MySQL server and resetting the password is a pain.
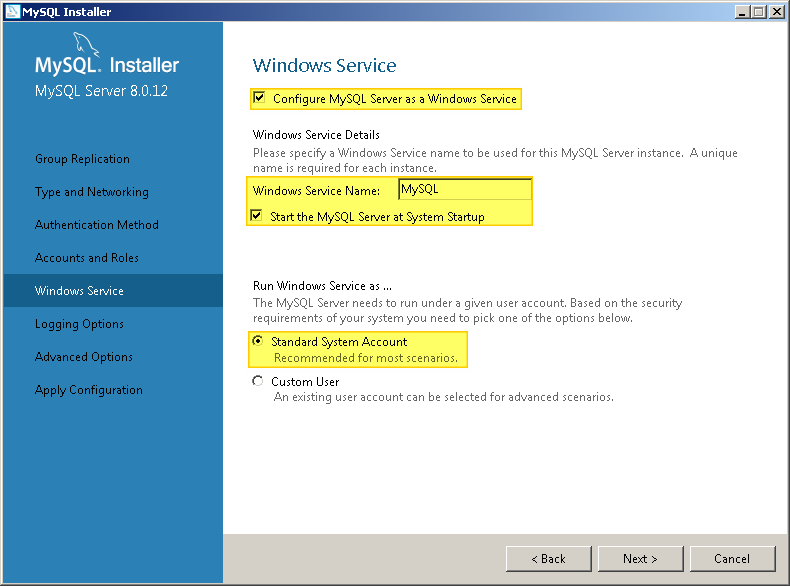
#### Windows Service
1. Check "Configure MySQL Server as a Windows Service
2. Windows Service Name: `MySQL`
3. Chose "Standard System Account"
**Note**: You don't necessarily need to change the Service name, but remember it for later,
we need it for the Mail server.
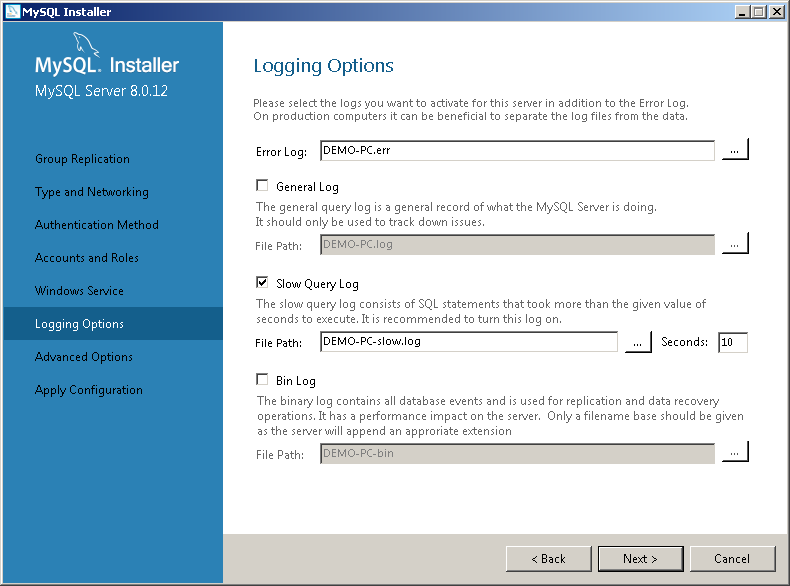
#### Logging Options
No change
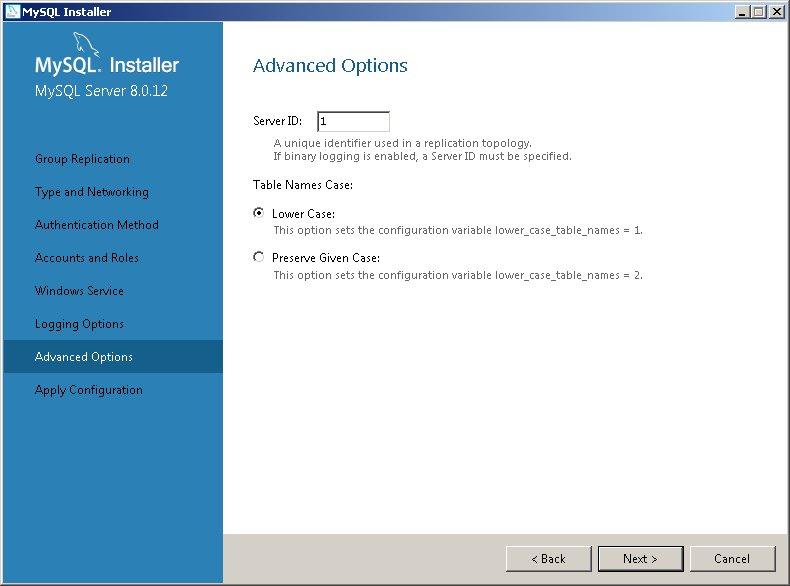
#### Advanced Options
No change
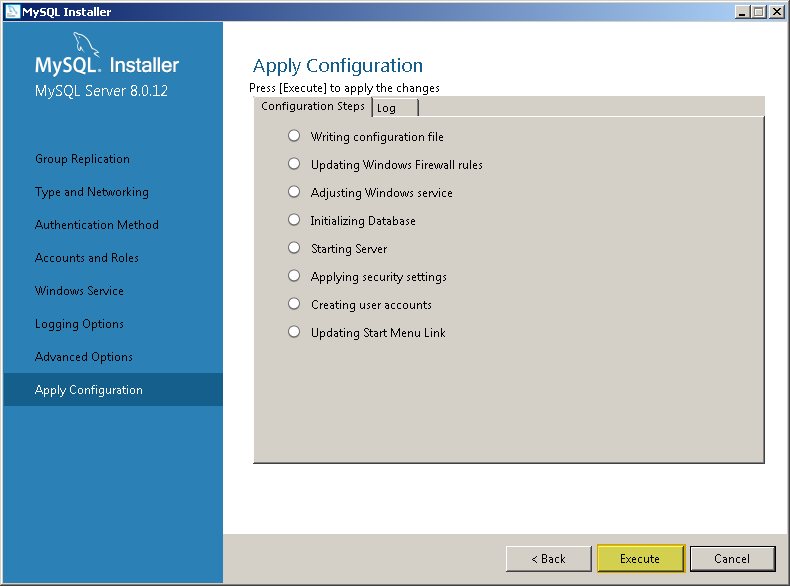
#### Apply configuration
No change, click "Exectute" and watch him go.
After that the SQL Server should be running and you can Finish the setup.
### MySQL Password
If you manage to lose it,
[you can follow these instructions](https://dev.mysql.com/doc/mysql-windows-excerpt/5.7/en/resetting-permissions-windows.html)
to reset the password.
## Step 4: Mail Server
We will install the Mail server now.
### Download
[Go to the hMailServer Website](https://www.hmailserver.com/download) and download the "Latest Version".
### Installation with MySQL
Use this chapter if you **did** do Step 3
1. Run the installer and click "Next".
2. Accept Terms and Services and click "Next".
3. Use the default installation path and click "Next".
4. Check all components and click "Next".
5. Check "Use external database engine" and click "Next".
6. Use default start menu settings and click "Next".
7. Define an administrator password and click "Next".
This can be the same as your windows and/or MySQL password but does not needs to be.
Similar with the MySQL password **you do not want to lose this**,
resetting it is a convoluted process.
8. Click "Install"
When you're prompted to enter your password, continue below.
#### Database Setup
1. Enter the hMailServer Password if requested.
2. Select "Create a new hMailServer database" and click "Next".
3. Select "MySQL" and click "Next".
4. Address: `localhost`, Port: `3306`, Database name: `mail`
5. Select "Use server authentication" and enter `root` as username and enter the MySQL password and click "Next".
6. Select The MySQL Service and click "Next".
7. Click "Next". This will log an error.
8. Download [libmysql.dll](data/libmysql.dll) and copy to the location specified in the message.
9. Click "Next" again to complete the Setup
**Skip over the next step and go to Step 5**
### Installation with the internal Database
Use this chapter if you **did not** do Step 3
1. Run the installer and click "Next".
2. Accept Terms and Services and click "Next".
3. Use the default installation path and click "Next".
4. Check all components and click "Next".
5. Check "Use built-in database engine" and click "Next".
6. Use default start menu settings and click "Next".
7. Define an administrator password and click "Next".
This can be the same as your windows password but does not needs to be.
Resetting this is a convoluted process so remember it.
8. Click "Install"
### Resetting the password
Even though I told you to not lose the password, you did anyways.
Here is how to reset it:
1. [Run](#run) `services.msc`
2. Stop `hMailServer`
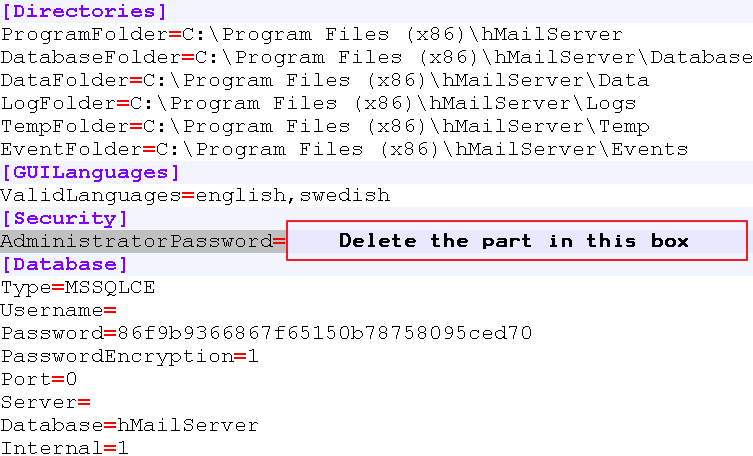
3. Go to `C:\Program Files (x86)\hMailServer\Bin` and open `hMailServer.ini` in notepad.
4. Find the line that starts with `AdministratorPassword=` and delete the random characters on that line that follow after the `=` symbol but leave that symbol.
5. Save the file
6. Connect using the hMailServer Administration Tool and without a password (it starts the service for you)
7. Set a new password under Settings ⇒ Advanced
If you have problems editing the INI file because of permissions,
save it to the desktop and then just copy it over the original.
## Step 5: Configuring Mail Server
### Creating the Domain Name and primary account
Open **hMailServer Administrator** from the hMailServer start menu folder
and connect to your localhost server using the password you specified.
Click the "Add Domain" button.
Enter your domain, in my case it would be `demo-mail.ddns.net` and Click "Save".
In the tree on the left, select "Accounts" below your domain and click the "Add" button on the right.
Enter `mail` as the address (or whatever you like) and define a password of your choice.
### Catch-All vs. Alias
You now have to chose which way to go,
so here are some important differences that can help you make your decision:
- Catch-All addresses literally catch all mails. This makes sending spam to you a lot easier
- Catch-All addresses require no configuration for new addresses. They "just exist" similar to a real throwaway account.
- You can't easily discard E-Mails
- Aliases require that you log into your E-Mail system every time you want a new address before you can use them.
- Aliases make disabling accounts as easy as deleting the alias itself.
- Aliases make it easier to look up all your addresses in case you forget one.
### Using a "Catch-All" address
Using a Catch-All address is simple but much less flexible than aliases (see above).
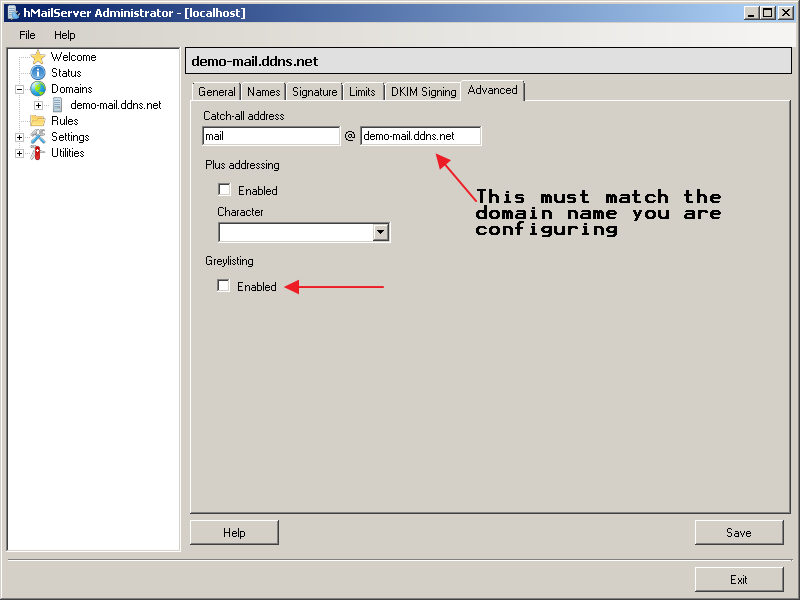
Select the tab "Advanced" and enter a Catch-All address, for example `mail@demo-mail.ddns.net`.
You can chose something else for the part before the `@` symbol.
I recommend that you only use letters and digits. The part after the `@` has to match your domain.
While you are here, make sure that "Greylisting" is unchecked and click "Save".
#### Blocking Mails with Catch-All
You have two rather "cheaty" methods to block Messages with Catch-All enabled.
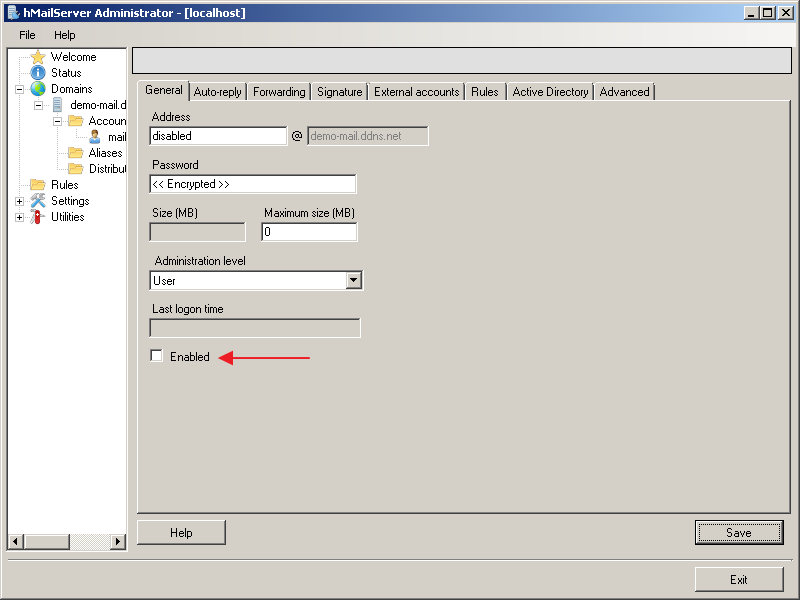
##### Creating disabled Accounts.
Create an account for the address you want to disable and uncheck "Enabled".
All mails to that address are now rejected.
##### Rules
You can create rules that delete messages from a certain sender.
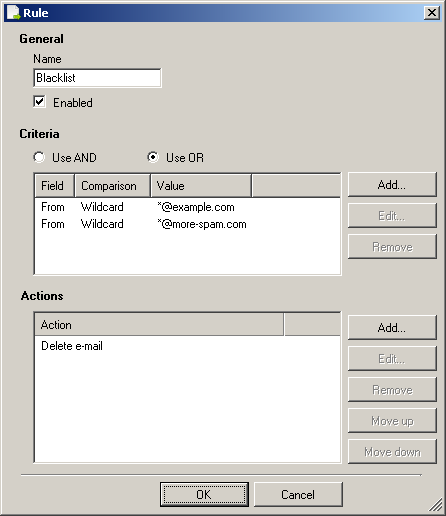
Go to the "Rules" tab of your main account and create a new rule:
1. Name: `Blacklist`
2. Check Enabled
3. Chose "Use OR"
4. Click "Add..." next to the "Criteria" Field
5. Select "Predefined Field" and chose the field "From"
6. Select Search Type "Wildcard"
7. Enter `*@example.com` and click "OK"
8. Click "Add..." next to the "Action" field
9. Select "Delete e-mail" and click "OK"
All mails from `example.com` are now deleted immediately.
This is a "blackhole" delete. The sender will not know that you discard his messages.
You can add more domains to the list later to expand it.
### Using Aliases
Using aliases allows you to better manage permitted senders
and you can see easier which addresses got sold by looking what the recipient of spam is.
A sender will never know that he is aliased.
#### Creating an Alias
**Do this for every company so everyone gets an individual E-Mail address**
In the tree on the left, select "Aliases" below your domain and click the "Add" button on the right.
Enter any address as "Redirect From" and enter your account address you created in the "To" fields.
Make sure "Enabled" is checked and click "Save".
**Tip**: After you successfully registered for a service you can disable the alias
to prevent any messages from them to reach you.
Enable it again if you need messages.

#### Blocking Mails with Aliases
If you want to no longer receive messages for an address you can just delete the alias or disable it.
### Optional Configuration
Feel free to look around the hMailServer Administrator tool.
You can for example change the maximum message size (Settings ⇒ Protocols ⇒ SMTP),
enable anti-spam blacklist services (Settings ⇒ Anti-spam)
or change your admin password (Settings ⇒ Advanced)
I personally recommend that you leave everything set to defaults.
### Fixing any errors
Click "Status" on the left and chck for any configuration warnings and fix them.
In most cases you just need to enter your dynamic domain name under "Settings ⇒ SMTP" in the "Delivery of e-mail" tab.
## Step 6: Firewall and Port forwarding
### Firewall
1. [Run](#run) `WF.msc`
2. Select "Inbound Rules" on the Left
3. Click "New Rule..." on the Right
4. Select "Port" and click "Next"
5. Select "TCP"
6. Select "Specific Ports" and add these: `25,143,587` and click "Next"
7. Select "Allow the Connection" and click "Next"
8. Check All Boxes and click "Next"
9. Enter `Mail Server` as Name and click "Next"
10. Close the Firewall Window
The rule entry should look like this (some columns are removed here for readability)

### Port forwarding
There are services that check if port forwarding is required.
You can search for "open port check" and try a few services from the results for port `25`.
If none of them works you need to forward a port.
#### Rule Settings
Your router wants some values:
- Rule Name: Doesn't matter
- Protocol: `TCP`
- External Port: `25`
- Internal Port: `25`
- Internal IP Address: Your computers IP address
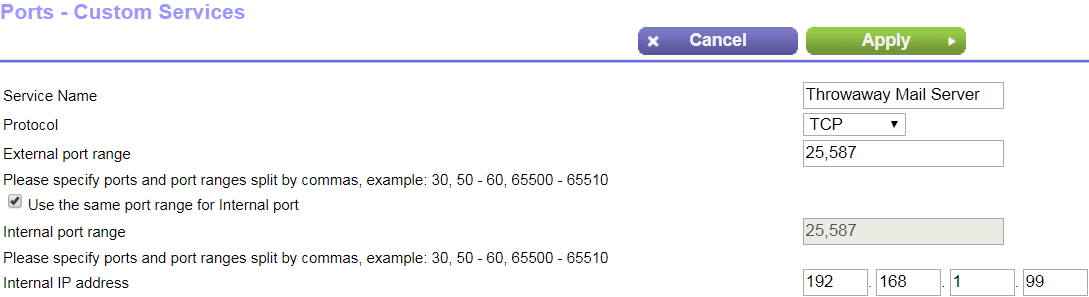
The image in the example shows both SMTP ports forwarded,
**this is not required** but I've seen E-Mail servers try both of them.
#### Outside access
You can forward port 143 if you want to be able to read your mails from anywhere on the internet.
In that case you would use the dynamic DNS name as hostname when configuring your E-Mail client.
Be sure to set a good password for your E-Mail setup.
#### ISP issued Devices
If you can't find the setting and your router is from your ISP, call support first,
the setting is sometimes remotely disabled and needs to be enabled.
#### Configuration Help
Try searching the internet for `port forwarding` and your router model.
If this fails, go to [portforward.com](https://portforward.com) and search your router.
**This site repeatedly tries to get you to download a software but you don't need to do that.**
Chose the manufacturer from the list and select your model.
If your model is not listed, chose one that closely resembles yours.
**Note**: This website recommends that you assign your computer a static IP address.
I recommend that you to this but it's not required.
Unless you turn off your computer for a week at once your router usually remembers it.
If it does forget your computer, just update the IP address in the port forwarding rule.
### Test
After you performed all the steps above, test the port 25 again using an online service.
## Step 7: E-Mail Client
Configuring your E-Mail client varies between vendors.
The values you need are these:
- (Display) Name: `Anything`
- E-Mail address: The address you configured
- Username: The full E-Mail address
- Password: The E-Mail account password (not the hMail admin password)
- Account type: `IMAP`
- E-Mail server: `localhost` (for both, send and receive)
- IMAP port: `143`
- SMTP port: `587`
- Encryption: None
- Authentication: Normal Password
- SMTP requires authentication: `Yes`
Confirm any security warnings you receive.
Using no encryption for `localhost` is no security issue in this case but this is usually not programmed into the application as an exception.
If you installed hMailServer on a different machine than your E-mail client,
don't use `localhost` but the IP address of that computer.
### Sending Messages
You will not be able to send E-Mails.
Almost all providers will flag your message as spam or outright reject it.
You can send messages to domains and addresses registered on your server because they never leave it.
### More Domains
Most free dynamic DNS providers allow you to register multiple domains.
There's no real reason for doing this apart from further organizing mails into categories.
### Real Domains
If you want to receive messages on a "normal" domain,
set its MX record to the name (not the IP) of your dynamic domain.
Don't forget to configure your real domain in hMailServer too.
Congratulations, your setup looks more legit now.
### Receiving Messages
The IMAP account type will automatically pull messages from the server as soon as they arrive.
To test if this works you can send yourself messages from the hMailServer administration panel
(Utilities ⇒ Server Sendout)